Niña
​nin-ya
  • About Me
    • Contact Me
    • Tourettes
    • Geeeetar Playin'
  • My Life
  • Travel Bug-a-boo
  • Fave Recipes
    • Photo Gallery
  • Picture the Taste
  • Bright Ideas
  • Reviews
  • About Me
    • Contact Me
    • Tourettes
    • Geeeetar Playin'
  • My Life
  • Travel Bug-a-boo
  • Fave Recipes
    • Photo Gallery
  • Picture the Taste
  • Bright Ideas
  • Reviews
Niña
​nin-ya

NIÑA ​ANINIAS

SHOP. COOK. EAT.
REPEAT.

My One and Only Roasted Chicken

10/27/2010

0 Comments

 
Picture
FV27-14-1010

Original Recipe: Bon Appetit
September 1999

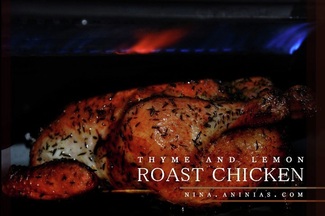
I love Roast Chicken. What's not to like? The aroma in the kitchen that whiffs out all over the house is hunger-inducing. Along the way, you hear the chicken fat burning at the bottom of the pan, which by the way will be your tasty gravy.

Once roasting is done, you take it off the pan and start carving, it's when your mouth starts to water because your eyes are already devouring it!

I'm yet to find a way to make the skin really crispy but that's just the icing on the cake. Crispy or not, this baby is tasty!

Tip 1: Truss the chicken to ensure it remains moist all throughout
Tip 2: Buy a meat thermometer, very useful for all types of roasting
Tip 3: Stick to 60 minutes and stick to the temperature. Even after you take the bird out of the oven, it will continue to cook so don't worry about it.
Tip 4: If you want to baste your chicken now and again, it's up to you. I'm lazy so I left it as is.
Tip 5: You don't have to broil your chicken, I did mine coz I was hoping to crispy up the skin more. It didn't really help so you can relax and skip that part. It looked good in the picture though :P

This took me an hour and half... I think I've improved a lot!

Ingredients:
1 kilo whole chicken
2 teaspoons minced thyme
1 lemon, quartered
5 garlic cloves, minced
Salt and freshly ground black pepper

Gravy:
1/4 cup dry white wine
1 cup chicken broth
2 teaspoons all purpose flour

Serves 4-6
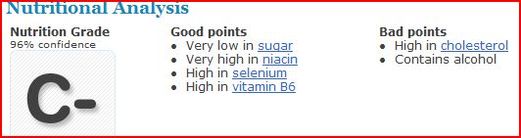
455 Calories per Serving

Preheat oven to 450°F. Mix 2nd to 5th ingredients in a bowl. Rinse chicken and pat dry. Place chicken in roasting pan and rub all but 1 tablespoon of garlic-thyme oil all over. Place lemon in the cavity and truss chicken.

Rain the salt over the chicken to create a uniform coating that will crisp up and add flavour to the skin (1 tbsp approximately)

Roast chicken 20 minutes then reduce oven temperature to 375°F. Roast chicken
about an hour or until your thermometer registers 180°F when you insert into thickest part of inner thigh.

Transfer chicken to serving platter, tent with aluminum foil to keep warm while you prepare your gravy.

Gravy
Pour pan juices into measuring cup. Over high heat, add wine to pan and bring to a boil. Scrap up any browned bits sticking onto the pan.

Pour the wine mixture into measuring cup and add chicken broth to measure 1 1/2 cups. Return the mixture to pan (don't clean the pan!), mix flour into reserved 1 tbsp garlic-thyme oil. Whisk into broth mixture. Boil mixture until slightly thickened, about 2 minutes. Season with salt and pepper and pour into a sauceboat!

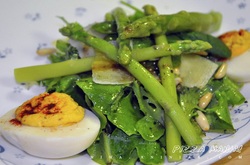
Serve your chicken with green salad, gravy and dijon mustard as sauce selection, roast some potatoes and you're good to go!

Start with fork and knife and finish off with your fingers... this dish is not for the delicate, prim and proper peeps out there. :)

Happy Eating!
Picture
Enjoyed this recipe? Subscribe to Fave Recipes for update!

Enter your email address:

Delivered by FeedBurner

0 Comments

Green Salad with Balsamic Vinaigrette

10/19/2010

0 Comments

 
Picture
FV26-13-1010

I went to our nearby bowling alley and ate green salad with balsamic vinaigrette... fell in love with it and vowed I'll copy it somehow. It's on the tangy side and I love tangy... especially on those days of the month when I crave like a pregnant woman.

It's still a working progress and I will definitely welcome your suggestions and versions...

INGREDIENTS:
Balsamic Vinaigrette Dressing
3 tablespoons aged balsamic vinegar
1 teaspoon Dijon mustard
2 garlic clove, peeled and crushed through a garlic press
1/2 cup extra-virgin olive oil
1/2 lemon extract
Salt and freshly ground pepper, to taste

Green Salad, 4-5 cups
Asparagus, poached
Arugula leaves
Baby spinach
Pine nuts, toasted
Parmesan cheese, shaved

209 Calories per Serving

In a small bowl, mix together dressing ingredients almost emulsifying the whole mixture.

Before serving, place all the leaves in a salad bowl and pour one tablespoon of vinaigrette dressing at a time. Using your hands, mix and toss leaves. This ensures leaves are just lightly coated and not soaking wet.

Take a handful of salad and place it on a plate. Sprinkle with pine nuts and topped with asparagus and shaved parmesan.

If you want your salad drenched in dressing goodness, then add some more on your plate :)

Serve this as a side dish or entree and enjoy!
Enjoyed this post? Subscribe to Fave Recipes for updates!

Enter your email address:

Delivered by FeedBurner

0 Comments

Pizzazzzzzzzz

10/19/2010

0 Comments

 
Picture
FV25-12-1010

I bought pizza dough weeks back and thought at some point we'll have cravings for pizza and it'll be fun to create our own. Last night was the night.

I'll make the real pizza dough from scratch next time but for now, these ready ones were so much fun.

My Only Tip: HAVE SO MUCH FUN


Toppings:
Artichoke (canned), base cut off and discarded
Olives (bottled)
Pepperoni
Ham
Feta Cheese
Baby Spinach
Mozarella cheese

Buy ready made pizza sauce as base.

It'll probably tastes so much better if everything is fresh, but when you're in a hurry, this strategy will be your lifeline... I think this is perfect for simple gathering with friends or just pizza night with the family.

I lost track of the time. All I know is we had soooo much fun

Bring your frozen pizza dough to room temperature before adding toppings. You want all the ingredients to be on even temperature to have better results.

To create your own pizza, spread as little or as much pizza sauce on the pie. This will be the base of your pizza.

Start adding toppings, again, as little or as many as you please.

We found out the following are yum-my!

Hawaiian - pizza sauce + mozzarella cheese + pineapple tidbits + ham
Meditteranean - pizza sauce + artichoke + sauteed mushroom + feta cheese + olives + baby spinach on top
Pepperoni - pizza sauce + mozzarella cheese + pepperoni
Usual - pizza sauce + mozzarella cheese + olives + ham + mushroom

More to add:
Ground beef, bell peppers, chicken left overs if any, smoked salmon, rocca leaves, capers, and so so many more choices to choose from!

Go to your nearest supermarket and start stocking for some ready pizza dough and pizza sauce. The rest will be up to what's in your fridge!

Oven Instruction:
Preheat oven to 400 degrees Fahrenheit. Bake your pizza for 15-20 minutes and voila! Your instant pizza is ready to eat!

Serve your pizza with your simple salad with balsamic vinaigrette dressing (I've added this to my list of recipes) 

Happy eating!


*Interested to make pizza dough from scratch? http://nina.aninias.com/1/post/2012/05/stuffed-crust-deep-dish-pizza.html
Enjoyed this post? Subscribe to Fave Recipes for updates!

Enter your email address:

Delivered by FeedBurner

0 Comments

Roasted Rack of Lamb

10/18/2010

0 Comments

 
Picture
oooops, my roast was upside down!
FV24-11-1010

My hubby loves lamb chops/rack of lamb,,, problem is I don't and I had no interest in cooking it.

After nine years together, I finally braved lamb one dinner. Disaster. It ended up dry on the inside and oh-so-greasy on the outside. I vowed never to subject myself again to such failure. Thought it's best to trust our reliable home delivery.

But since I'm back in the kitchen nowadays, I asked myself ala an Italian mafia, "what's another try, eh?" I'm glad I did. :)

Tip 1: Make sure you have a meat thermometer.
Tip 2: Do not try to add so many different flavours onto your lamb, you want the lamb flavour to be the star of this dish
Tip 3: Ask your butcher to "french" them for you. If not, watch youtube to learn how to do it (exactly what I did!) :)

Done in half an hour, nothing more (oh yeah!)

INGREDIENTS

1 1/2 pounds or 8-ribbed rack of lamb
2 teaspoons chopped fresh rosemary
1 teaspoon chopped fresh thyme
2 cloves garlic, minced
2 tablespoons olive oil
salt and pepper

Serves 4, 2 ribs each
437 Calories per Serving


Combine rosemary, thyme, garlic and fresh ground black pepper. Rub your rack all over with the combine herb and seasoning.

Put the rack inside a medium size storage bag. Add oil and toss the rack around to ensure oil coated it all over.

Marinate overnight.

Bring the lamb out to room temperature 2 hours before you plan to cook it.

Pre-heat your oven to 400 degrees Fahrenheit.

Sprinkle the lamb with salt and pepper before placing it on the roasting pan, bone side up (just our little secret, I did mine upside down!).

Roast the lamb for 7 minutes before lowering the temperature to 350 degrees Fahrenheit and roasting it for a further 15 minutes.

You know it's done when you insert your meat thermometer to the thickest part and it registers 130 degrees Fahrenheit (medium rare) or 140 degrees Fahrenheit for medium to well done or 150 degrees Fahrenheit for well done

Let it rest under a tent foil for 10 minutes before slicing it to preferred servings.

Serve with rice or with mash potatoes! Enjoy!

*curious why my lamb looked overdone? my hubby will never eat anything pink that's why!
Picture
Enjoyed this recipe? Subscribe to Fave Recipes for updates!

Enter your email address:

Delivered by FeedBurner

0 Comments

Deviled Eggs

10/17/2010

2 Comments

 
Picture
FV23-10-1010

I know nothing about deviled eggs... until an old classmate of mine posted a photo of her deviled eggs in facebook. It got me all curious so here it is.

This is best prepared for gatherings, potluck and what not. I experimented on this on one occasionless day and I ended up eating most of it. It's not that morish-type dish and so thank goodness for appetite, I have a big one. 

Sure my kids think I was possess to finish them all but I seriously hate great tasting food go to waste. Don't worry, it took me quite awhile and some creativity to ensure it's consumed. I said big appetite not "magician". Even elephants will prolly take a rest.

Tip 1: Skip the hot paprika if you don't like spicy food.
Tip 2: This dish is so forgiving that you can play around with the flavours, add as many herbs and spices as you like, this will still end up a fantastic dish.
Tip 3: Since the mashed egg is so flavourful, you can use it as a dipping dish for toasted bread, bread sticks, veggies, etc.

30 minutes, not a minute more :P

8 large eggs
1/3 cup mayonnaise
1 1/2 tablespoons Dijon mustard
2 teaspoons apple-cider vinegar
Salt and pepper to taste
2 teaspoons finely chopped shallots
2 tablespoons finely shredded Cheddar cheese
2 slices of crispy bacon
hot paprika, to taste

Boil eggs and peel off shells.

Fry the bacon on a skillet until it's really, really crispy. Using your chopper, break the bacon until it's the same size of your minced shallots.

Peel the eggs and cut each lengthwise. Scoop out yolks to a mixing bowl. Add everything except the hot paprika and mash them all together.

Transfer the mixture to a piping bag and pipe it into all cavities. 

To finish off, sprinkle the stuffed eggs with paprika.

Cover it with plastic and refrigerate until ready to serve. 
Enjoy this recipe? Subscribe to Fave Recipes updates!

Enter your email address:

Delivered by FeedBurner

2 Comments

Oven Roasted Pork Ribs

10/16/2010

0 Comments

 
Picture
FV22-09-1010

Back home we only have BBQ the grill version. We also marinate in a sauce concoction.

This time I've decided to get out of my comfort zone and use a totally different way of cooking ribs, in the oven, dry rub, broiler pan, broiler, BBQ sauce and still have the same result,,, finger lickin ribs!

Tip 1: If you don't have a broiler pan, improvise! I did. I used my all metal wok, fill it with apple juice, used french fries oven pan as the top portion and voila, instant broiler pan!
Tip 2: You can use as little or as much BBQ sauce as you want. You can even omit it if you are happy with the dry rub flavour.
Tip 3: Be as messy as you want.
Tip 4: Because this dish doesn't have lots of active time, take it as the perfect opportunity to prepare your side dish(es)

Tip 5: Dry rub will last for months so make as much as you want and keep it for your next BBQ

Total time:
24 hours marinate
2 1/2 hours roasting time
10 minutes or so broiling time


INGREDIENTS
Dry Rub
1/2 cup brown sugar
1/4 cup sweet spanish paprika
1 tablespoon black pepper
1 tablespoon salt
1 tablespoon garlic and herb powder (or just plain garlic powder will do)
1 teaspoon cayenne

1 kilo pork ribs
4 cups apple juice
favourite bbq sauce

Using dry rub, marinate the ribs overnight.

Pre-heat your oven at 300 degrees Fahrenheit.

Fill the bottom section of the broiler pan with apple juice while you lay out your ribs on the top section.

Enclosed the whole broiler using aluminum foil. This ensures the ribs gets all the gloriousness of the apple juice steam. This helps the ribs cook without losing flavour.

Roast the ribs for 1 1/2 hour.

Take it out and slather your favourite BBQ sauce on each rib before covering it once more with tin foil and putting it back to the oven for another hour.

Take your ribs out of your broiler pan and place it on a shallow baking pan. Place it under oven broiler to caramelised the sauce. Cook it until it's charred the way you prefer it to be.

Serve immediately with rice, chips, wedge, mash... serve it with whatever side dish you want! Enjoy getting your fingers all sticky and messy.
Enjoyed this recipe? Subscribe to Fave Recipes update

Enter your email address:

Delivered by FeedBurner

0 Comments

Asian Fried Rice

10/16/2010

1 Comment

 
Picture
FV21-08-1010

I grew up eating rice every single possible meal. Don't get me wrong, I never get tired of it. It's like chips, wedges, mashed, boiled potatoes in the West. It's a staple on everyone's table.

Some wonder how we still don't seem to be on the heavy side after all those rice. Beats me, I have no answer.

Back home it's normally Garlic Fried Rice but I've decided to try Asian Fried Rice this time. I fell in love with it when I first tasted an authentic one in Hong Kong. Although it's a meal by itself, the taste is so adaptable that even if you eat it with another dish, it complements it instead of competes with it.

This took me 15 minutes, and yes, I'm on the mark :)

INGREDIENTS
3-4 cups of left over rice
3/4 cups chicken stock
1 ham steak (cut into cubes)
1/2 cup frozen peas (mixed veggies if you prefer)
3 eggs, lightly beaten
3 tablespoons canola oil or peanut oil
1 1/2 tablespoons Kikkoman soya sauce

Heat a teaspoon oil in a pan and cook scrambled eggs. Add peas and ham and fry for about 2 minutes then set aside.

Heat remaining oil into the pan or wok and add rice. Separate rice which are clamped together. Add chicken stock and let rice soak in it for a few seconds before stir frying.

Return the egg, veggie mixture and soy sauce. Stir fry until sauces and seasonings coats every morsel.

Serve on its own or with bacon, sausage, smoked fish or whichever left over food you feel like eating. Bon Appetit!
Enjoyed this post? Subscribe to Fave Recipes updates!

Enter your email address:

Delivered by FeedBurner

1 Comment

Chocolate Fondant - Molten Lava Cake

10/10/2010

0 Comments

 
Picture
FV20-07-1010

I have to say, this blog was the most challenging. My site wasn't working with me the way it should and I had to do this four times to load it up.

I was thinking maybe it's a sign,,, don't share the freaking recipe! Oh well, why shouldn't I? First off, this isn't really my recipe. Second, this is so simple yet a fantastic recipe that it's a sin not to share it.

Mind you, this isn't the recipe I was supposed to learn from my quickie course. You'll be surprised at how easily you will get confused with the ingredients and techniques when you're making three chocolate dessert simultaneously. By the time our chef sent the recipe, I wouldn't know which is which.

Needless to say, my first attempt at this cake was a huge flop. Disaster so humongous that I couldn't even get myself to take photo of it. It got confused whether it'll be an omelette or a dessert.

So after researching as if my life depended on it, I finally want to expose the mystery of this fondant once and for all, well at least to my avid readers. So here it goes...

Tip 1: Use at least 60% coco chocolate when making this. I used 65% Madagascar chocolate bar by Lindt.
Tip 2: If you're using muffin tin, then the baking time will be less 2 or so minutes.
Tip 3: Use cocoa powder to prep the ramekin or muffin tin so when you flip your fondant, you don't have the ugly white flour on your gorgeous creation. 
Tip 4: Fold your mixture, don't beat the air out of your cake... I actually made this mistake but will not do it again on my third attempt.
Tip 5: Add more sugar if you prefer your fondant sweeter.

This took me less than 30 minutes... just about the right time I say.

INGREDIENTS:
100 grams chocolate
100 grams softened unsalted butter
3 egg yolks
1 whole egg
1/4 cup caster sugar
1/4 cup flour 

Serves 1 medium fondant or two small ones.

Preheat the oven to 450 degrees Fahrenheit.

Grease your ramekin or muffin tin generously with softened butter and unsweetened cocoa powder. Freeze it for 15 minutes to ensure that the grease is well set.

Melt the chocolate with butter on a double boiler or bowl over a pan with steaming water.

Beat the egg yolks, whole egg and caster sugar together until almost double in size.

Slowly fold the chocolate mixture to the egg.

Once all ingredients are well incorporated, pour the mixture to the prepared ramekin.

Bake it for 7-9 minutes or until the dome forms on top. Depending on how gooey you like your chocolate fondant, adjust the baking time down to 6 minutes or up to 10 minutes.
Did you enjoy this post? Subscribe to Fave Recipes page for updates!

Enter your email address:

Delivered by FeedBurner

0 Comments

Slow Cooked - Beef Stroganoff

10/10/2010

0 Comments

 
Picture
FV19-06-1010

Being the true late bloomer that I am, (if you even consider me "blooming"), after few decades of existence, I finally discovered the magic of a slow cooker, better yet, the existence of a slow cooker.

It's pathetic but I do feel like crying over spilled milk here. Years (well not really) of slaving trying to really nail good stews, casseroles and what-not (baloney!), only to discover that I wasn't really being efficient with everything! IT HURTS to realize, I got duped!

Tip 1: Just follow the instruction to the tee.
Tip 2: Don't hover around the cooker, do something productive! This is the whole point of our journey, I help you improve your laziness in the kitchen so you can do something else with your family...

INGREDIENTS
1 kilo cubed beef stew meat / rib eye / chuck or whichever part you fancy
1 (10.75 ounce) can condensed cream of mushroom soup
1 (10.75 ounce) can condensed cream of chicken and mushroom soup
1 cup chopped onion
2 tablespoon Worcestershire sauce
1/2 cup water
1 beef buillon cube
8 ounces cream cheese
1 packet of onion soup mix
1 packet/box of button mushroom (around 10 medium), quartered
Dollop of sour cream
1 teaspoon salt
1/2 teaspoon pepper, ground

Preparation Time: 10 minutes
Cooking Time: 8 hours on Low Setting, or on High Setting for about 5 hours.

In a slow cooker, combine everything except sour cream, cream cheese and button mushroom.

Half an hour before the end of cooking time, saute your button mushrooms in butter before adding it to the rest of the ingredients in the cooker.

Stir in cream cheese and dollop of sour cream just before serving.
0 Comments

Cinnamon Roll

10/2/2010

0 Comments

 
Picture
FV18-05-1010

My whole family loves cinnamon roll.

When I told them I'll be trying my hands on cinnamon rolls soon, they didn't leave me alone until I did. I'm quite glad they kept me on my toes.

Tip 1: Don't scrimp on the sugar and cinnamon mixture, I did because I was still very cautious. My rolls came out great but it would have been fantastic if I used up all the mixtures.
Tip 2: Make sure you roll the bread tight, not leaving any space in between.
Tip 3: Secure the end of the single rolls by using a toothpick, just to ensure it won't open in the process (yup, one of mine did).
Tip 4: Give 3-inch space around each roll, it expands as it cooks (I didn't post the photo of the ginormous ones, it was as big as plates!).
Tip 5: Use piping bottles or bag to top the rolls with cream cheese mixture.
Tip 6: Do something else while waiting for the dough to rise :P

Active time, it took me 45 minutes, waiting time... too long for an impatient person like me

INGREDIENTS:
Bread

100 ml warm water
2 1/4 teaspoon active dry yeast
1 cup warm milk
1/2 cup white sugar
4 1/2 cups bread flour, sifted
1 teaspoon salt
2 eggs, room temperature
1/3 cup margarine, melted

Cinnamon Mixture
1 cup brown sugar
2 1/2 tablespoons ground cinnamon
1/3 cup butter, softened

Topping

3 ounce cream cheese, softened
1/4 cup butter, softened
1 1/2 cups confectioner's sugar (icing sugar)
1/2 teaspoon vanilla extract/ essence or few bits of vanilla from pods
1/8 teaspoon salt

20 generous portion

Preheat the oven to 400 degrees F.

Mix warm water and dry yeast then leave it for 10 minutes to activate. You will know yeast is alive when after 10 minutes, a bubble appears on top.

Add yeast mixture to warm milk, stir and set aside while you prepare the dry ingredients.

Put the sifted bread flour in a big mixing bowl. Add salt and sugar then mix thoroughly. Add the eggs, margarine and the yeast-milk-sugar mixture into the bowl. Mix all ingredients using spatula. Once all dry and wet are mixed well, use your hand to knead and complete the process.

Cover the bowl with cloth and leave for 2 hours for the dough to rise (It'll double in size).

Turn the dough out to a lightly floured surface, cover and let it rest for another 10 minutes.

Make the cinnamon filling by mixing sugar and cinnamon in a small bowl. Set aside.

Roll the dough on a flat surface, size of which should be approximately 16x21 inches.

NOTE: I did mine as one big roll and made 12 humongous rolls,,, tooooo big for one sitting. It's really up to you to decide how small or how big you want your roll. You don't want to scare your family with gigantic portions the way I did.

Spread 1/3 cup of melted butter on top of the flat doughs. Sprinkle the cinnamon mixture evenly. Roll up dough and cut it into 12 small rolls.

Place rolls in a lightly greased baking pan or pan with waxing paper. Leave a good space around the rolls. (I made mine tooo close to each other and I really wish I didn't). Cover again with cloth and let rise for about 30 minutes.

Bake rolls in preheated oven until golden brown, about 15 minutes.

In the meantime, beat together cream cheese, 1/4 cup butter, confectioner's sugar, vanilla extract and salt.

Spread frosting on warm rolls before serving.

I love this and I hope you will too!
 
Happy baking!


-AcousticChef, cookin' one tune at a time!
Did you enjoy this recipe? Subscribe to Fave Recipes Page

Enter your email address:

Delivered by FeedBurner

0 Comments
<<Previous

    Fave Recipes

    I'm No Chef but I love food like it's no one's business.

    I didn't know anything about cooking... frying an egg used to be a nightmare.. until I was forced to learn more... I had my first born... that's when my gastronomic journey started...

    Join me in my food quest.
    Laugh at my embarrassing moments.
    Share my triumphs.

    And if you're brave enough ... cook with me (ooooh scary!), virtually that is, and have the most enjoyable time!

    Welcome aboard
    fellow foodies!

    Print Friendly and PDF

    Categories

    All
    Ac Spin
    Appetizer
    Baking
    Bbq
    Beef
    Bread
    Breakfast
    Butter
    Chicken
    Dairy
    Dessert
    Drink
    Entree
    Fave
    Fondant
    Gobbledtooquicklyphotosnexttime
    Halloween
    Icing And Frosting
    Lamb
    Main Course
    Marinade
    Nibbles
    Occasions
    Pasta
    Pastry
    Pork
    Poultry
    Rice
    Salad
    Sandwich
    Sauce
    Seafood
    Side Dish
    Slow Cooker
    Smoothie
    Snacks
    Soup
    Spaghetti Challenge
    Stew
    Stock
    Tapas
    Vegetables
    Workinprogress
    Zespiri Kiwifruit

    Archives

    February 2016
    January 2016
    January 2013
    November 2012
    October 2012
    September 2012
    August 2012
    July 2012
    June 2012
    May 2012
    April 2012
    March 2012
    February 2012
    September 2011
    August 2011
    July 2011
    June 2011
    May 2011
    April 2011
    February 2011
    January 2011
    December 2010
    November 2010
    October 2010
    September 2010
    August 2010

    RSS Feed

Powered by Create your own unique website with customizable templates.