Niña
​nin-ya
  • About Me
    • Contact Me
    • Tourettes
    • Geeeetar Playin'
  • My Life
  • Travel Bug-a-boo
  • Fave Recipes
    • Photo Gallery
  • Picture the Taste
  • Bright Ideas
  • Reviews
  • About Me
    • Contact Me
    • Tourettes
    • Geeeetar Playin'
  • My Life
  • Travel Bug-a-boo
  • Fave Recipes
    • Photo Gallery
  • Picture the Taste
  • Bright Ideas
  • Reviews
Niña
​nin-ya

NIÑA ​ANINIAS

SHOP. COOK. EAT.
REPEAT.

Rolled Fondant Icing

7/31/2011

0 Comments

 
Picture
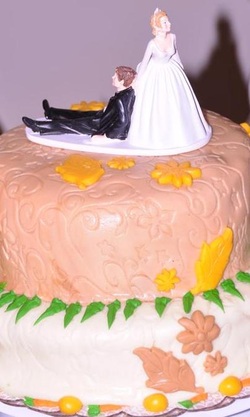
My mom and dad's wedding cake on their 40th wedding anniversary when they renewed their vows...
Wow. Never ever thought I'll be writing about Fondant anytime soon. Not the chocolate fondant where it's gooey on the inside which I also love.

I'm talking about rolled fondant that you use to cover cakes for special occassions. The fondant that intimidated me for soooo long, I think a lot of people for that matter. I can't even begin to explain my relief when I looked at my first ever cake, covered in glorious fondant.

Having the stand mixer made my baking life easier. Making a fondant? Stand mixer is truly heaven-sent.

Tip 1: When you reach the stage that you have to add the remaining 4 cups.
If you have a stand mixer, then use it, speed no. 2, using the hook attachment.
Tip 2: To roll out fondant, your pin must be silicon made. Fondant will stick to wooden pin.
Tip 3: To know if your fondant is ready to be rolled by moulding a small shaped stone, drop it on your work surface. It should spread slightly but must retain its shaped.
Tip 4: Sprinkle your work surface with confectioner's sugar to avoid getting your fondant stuck on your surface. If you are in a humid location, like the middle east for example, then use half cornstarch, half sugar. If you use only sugar, it will become more sticky because sugar attracts moisture from the air.
Tip 5: After a couple of rools, turn your fondant a quarter turn at a time to avoid it from getting stuck on the surface.
Tip 6: You should only cover cakes which are firm. Fondant is heavy and any cake that's not strong enough will be easily weighed down by fondant. I made a mistake of covering a carrot cake with a soft bodied cream cheese frosting on my second try, and let's just say, it didn't keep its shape well.
Tip 7: Because fondant is practically solid sugar, most people don't like the taste of it and peel it off the cake, so make sure your cake inside is full of flavour.


Ingredients:
1 tablespoon plus 2 teaspoons unflavored gelatin
1/4 cup cold water
1/2 cup glucose
2 tablespoons vegetable shortening
1 tablespoon glycerin
8 cups sifted confectioner's sugar
icing colour and flavouring, as desired
Extra confectioner's sugar to find your right consistency

Can cover 10 inch x 4 inch high cake. (appox 36 oz)

Procedure:
Mix gelatin and cold water, let it stand for 3-5 minutes, until the gelatin is well soaked. Using a double boiler, heat the gelatin mixture until it's dissolved. Add glucose and mix well. Add shortening and wait until it's almost completely melted. Add glycerin (flavouring and colour, if adding any). Cool the mixture until lukewarm.

Grease the side of your mixing bowl with shortening. Place 4 cups confectioners' sugar and make a well in the middle. Pour the gelatin mixture into the well. Start mixing from the middle with your wooden spoon until all sugar all sugar are well combined.

Add the remaining 4 cups of sugar, a cup at a time. Mixing well on every addition. Knead until the stickiness disappears and mixture becomes pliable. When it starts clearing the sides of your bowl, transfer the mixture on a smooth work surface, either on a granite counter top or a silicon mat for further kneading. 

Knead your fondant with additional sugar if needed until your fondant becomes smooth and pliable.

Use your fondant immediately or keep it in an airtight container in a cool and dry place. Do not refrigerate! If you're ready to use it, knead it again until soft.

Roll your fondant about 1/4 inch thin. Transfer fondant to your previously crumb coated cake and smooth it until your happy with the end result. Add your finishing touches, either other moulded fondant or royal icing designs.

Enjoy your well deserved pat on the back!
0 Comments

Jumbo Chocolate Chip Cookies

7/29/2011

0 Comments

 
Picture
Baking cookies is something I'm never into. There's always something out of the box, which tastes good, so why make it harder for me... but hey... whatever rocks my kids boat... I'd give a try.

And so I brave it... I baked cookies with the help of my sous chefs... It was fun... it won't be the last time, they already have flavours in mind, to as normal as raisin, oatmeal cookies, almond and chocolate cookies, to as bizarre as cheese cookies.

Tip 1: After you drop the dough onto your mat, flatten just a little bit, not too much because it'll spread too thin when it bakes
Tip 2: If you don't have cup cake flour, replace it with 1 cup minus 2 tablespoons all purpose flour
Tip 3: Make sure you don't burn the underside of your cookies... either by taking it out early or lowering the temperature, you'll have to try and test your first batch. Even if you take it out early, it'll still continue cooking.

Ingredients:
3 1/4 cups all-purpose floor
1 cup cake flour
1 teaspoon baking soda
1 1/2 cups butter, softened
1 cup granulated sugar
1 cup packed brown sugar
2 large eggs or 3 small eggs
1 tablespoons vanilla extract
1 1/4 cups Semi-sweet Chocolate Morsels

Procedure:

Pre-heat oven to 375 degrees F

Combine all-purpose flour, cake flour, baking  powder and baking soda in medium bowl. In a large mixing bowl, combine butter, granulated sugar and brown sugar. Beat until creamy. Add eggs and vanilla extract. Beat until well mixed. Gradually add the flour mixture into the sugar mixture. Stir in morsels.

Using an ice cream scooper, drop dough (approx 1/4 cup) onto your baking sheets, 2 inches apart.

Bake for 10-14 minutes or until golden brown. Cool on baking sheets for 2 minutes, transfer to wire racks and completely cool.

Forget about your diet and dig in!

This is my first attempt ... hopefully the next one will be baked to perfection...

0 Comments

English Pancakes

7/24/2011

1 Comment

 
Picture
Until recently, I thought there are only 2 types of pancakes, the American ones, fluffy, thick, stackable, not sweet so you eat it with maple syrup or honey. The other one is what I got used to back home, comes in a box, a bit too sweet,  you don't need syrup to go with it at all!

Then, I was watching Masterchef Australia Season 2 when one of the challenge is making proper English Pancakes and how different it was from the American ones.  I felt intrigued but still don't know how it can be any different.

Then I thought, why the heck not? I'm pretty sure the four of us can finish a whole batch, regardless of how it taste. It's pancake! How can anyone go wrong with it?

I am forever converted. I consider English pancakes as the adult version of the usual pancakes I know of. It is a cross between French crepe and American pancake. Ingredients similar to Americans but the texture is closer to French's. It's like crepe but a teeny wee bit thicker.

I know I'm probably being melodramatic but English pancake seem to taste healthier. 

My kids still like their fluffy versions. They said they don't like my new version much but they don't mind eating it (same goes to any food I serve them). 

Tip 1: If you want your pancake less sweet, then just use 1 1/2 tablespoons sugar
Tip 2: Use an ice-cream scooper, regular size starts from 2 tbsps for a more even size and thickness
Tip 3: Spread your batter on the pan as thin as you want them.

Ingredients:
2 cups all-purpose flour
3 tablespoons extra-fine granulated sugar
pinch of salt
1 whole egg
2 egg yolks
2 1/2 cups milk
2 tablespoons vegetable oil, divided
60 grams unsalted butter

Choice of garnish, chocolate syrup or chips, icing sugar, lemons, oranges, strawberry, whip cream, roasted almond slivers, you name it. Whichever you want as toppings.

Makes 20 English pancakes

Procedures:
Whisk together, flour, sugar, salt, egg and egg yolks, milk and 1 tablespoon vegetable oil. Whisk until the mixture is lump-free.

Melt butter in a small saucepan until it is golden brown. Whisk it into the pancake mix.

Leave the batter to rest for about 15 minutes.

Heat a non-stick frying pan until hot, add the 1 tablespoon, tilting to grease the whole pan. Pour the excess oil into a small bowl for later use.

Pour 2-3 tablespoons of batter into the pan. When the underside is golden brown, flip it using a spatula. Few seconds and you can turn the pancake on a plate.

Repeat until there's no more batter. When you notice the pan getting dry, use the reserved oil to re-grease the pan by just a drop and spread around using the back of the spatula.

When finished, serve the pancakes straightaway with icing sugar sprinkled over it, and other garnishes you feel like having with your healthy English Pancake.

Be warned... 3 thin English pancakes is filling... don't be fooled by it's size!
1 Comment

Packet of Baked Salmon

7/22/2011

0 Comments

 
Picture
Salmon is one of the very few fishes that I love to cook. It's meaty, it tastes healthy, it's forgiving, you can grill it, bake it, fry it, do whatever you want to do with it and it'll still turn out great!

Though Salmon is pricier than most common fish, for whatever size you buy, it's going to serve double than usual as it's really filling.
 
This dish works well with fusilli alla caprese but I'm pretty sure it'll taste just as good with fried rice or steamed rice.

Tip 1: Ask your fish monger to take the skin off the fillet. If they can't, slice it off with a sharp knife.
Tip 2: De-bone your salmon by running your fingers all over the fillet and take off any bone you find by a tweezer

Takes 35 minutes to cook, oh so worth it!

Ingredients:
4 salmon fillets (approx 150 grams each)
2 teaspoons olive oil
Salt and freshly ground black pepper
Extra 2 tablespoons olive oil
3 tomatoes, chopped
2 onions, chopped
2 tablespoons fresh lemon juice
1 teaspoon dried oregano
1 teaspoon dried thyme
Knob of butter

Serves 4

Procedure:
Preheat the oven to 400 degrees F

Sprinkle salmon with 2 teaspoons olive oil, salt and pepper.

In a small bowl, mix the tomatoes, onions, 2 tablespoons of oil, lemon juice, oregano, thyme, salt and pepper. 

Place a salmon fillet, oiled and seasoned side down, atope a sheet of foil.

Spoon the tomato mixture over the salmon and add a slice of butter on top.

Gather the sides of the foil packet forming a seal. Place the foil packet on a heavy large baking sheet.

Bake until the salmon is just cooked through, about 25 minutes.

Serve on foil packets or transfer salmon on a plate while reserving remaining juice on a small bowl as spooning sauce.

Happy Eating!!!     
0 Comments

Fusilli ala Caprese

7/22/2011

0 Comments

 
Picture
I was watching BBC Food which I always to do when I get bored from all the non-stop reality shows and series. Saw Giada De Laurentiis cook this recipe and I thought, what a fantastic combination!

I love, love, love, lurve caprese... I'll wouldn't mind eating it every week if there's a chance and to have it with pasta is certainly a brilliant idea!

I sort of just tweak this recipe a bit because I read it's a bit bland so I say, add whatever you think you like to eat with pasta. I don't think you could ever go wrong with this recipe.

Tip: Just enjoy. It's soooo easy that there's really no need for any tip.

Takes 15 minutes, it can't be quicker than this.

Ingredient:
500 grams fusilli pasta (whichever pasta you're in the mood for)
3 tablespoons olive oil
4 cloves garlic, minced
2 cups cherry tomatoes, quartered
1/2 cup crushed tomatoes
2 teaspoon salt
1 teaspoon freshly ground black pepper
3/4 cup fresh basil leaves, torn
340 grams or 12 ounces fresh mozzarella, diced
1/2 cup parmegiano regiano, grated

Serves 4-6

Procedures:
Bring a large pot of salted water to a boil over high heat. Add a knob of butter or few drops of olive oil in the pot. Add the pasta and cook until al dente or cooked according to your liking (I'm the only one who appreciates al dente in my whole family, everyone else wants it on the verge of sagginess).

While pasta is cooking, start cooking your sauce. In a medium skillet, heat the olive oil over medium heat. Add the garlic and saute until fragrant, about 2 minutes. Add cherry tomatoes, salt and pepper. After about a minute, smash the tomatoes with a fork. Continue cooking until your sauce becomes chunky, about 4 minutes. Add your crushed tomatoes and 1/4 cup parmegiano and continue stirring for another minute.
 
Drain pasta and transfer into a large bowl, make sure you reserve 1/2 cup of the cooking liquid. Transfer the tomato sauce to the bowl with pasta. Sprinkle with the remaining 1/4 cup parmegiano, basil leaves and mozzarella. Toss until well combined. Add the reserved water if you want your pasta to be moist.

Serve with extra parmegiano on the side. We ate this pasta with "Packet of Baked Salmon" and it was a perfect combination. I'm sure this pasta will taste just as nice with grilled food, seafood, pork chop or breaded chicken. It's that versatile... so start cookin'!
0 Comments

Moist Chocolate Cake or Cupcakes

7/20/2011

1 Comment

 
Seems like a lot of my friends love chocolate cakes and cupcakes and so I'm sharing this recipe I recently discovered.

With this recipe I used my Coffee Buttercream (click for recipe) to ice the goodies.

Tip 1: If you don't have a double boiler, you can use a glass bowl like Pyrex that will be placed on top of a pan of simmering water. The bowl must not touch the water but will be steamed by the hot air it sealed at the bottom.
Tip 2: If you're using a stand alone mixer, like Kitchen Aid, use the paddle to mix your batter. If not, normal beater will do. 
Tip 3: Depending on your

Ingredients:
2 1/2 cups all purpose flour
1 teaspoon baking soda
1/2 teaspoon salt
170 grams semi-sweet chocolate
3/4 cup or 1 1/2 sticks or 170 grams softened butter
1 1/2 cups granulated sugar
3 eggs
2 teaspoons vanilla extract
1 1/2 cups milk (room temperature)

Makes 24 cupcakes or 1 decent height 8-inch cake

Preheat oven to 350 F.

Cake: Grease and flour your pan or spray your pan with cake release if you have one.
Cupcakes: Line your pan with cupcake liners.

Flour mixture: In a medium bowl, combine flour, baking soda and salt.

Choc mixture: In a double boiler, melt chocolate and butter. Stir your chocolate until it is completely melted.

In a large mixer bowl, combine your chocolate mixture with sugar. Beat with electric mixer until it's well blended.

Add eggs one at a time, add vanilla and mix well. Add flour mixture alternately with milk; beat until well blended and smooth. 

Pour batter into prepared pans. 

Bake your cake for at least 60 minutes. Cool 10 minutes in pan on rack. Gently loosen sides with spatula and remove. Cool completely before decorating.

For cupcakes, bake for 25 minutes. Cool on racks and start devouring!

To up the ante of your cake: With a cake leveler or a serrated knife, slice your cake horizontal to make 2 or three levels. In between, spread your buttercream icing and fresh slices of strawberry.

To up the ante of your cupcake: Swirl icing on top and top with half slice of strawberry for sexier presentation.

To up the ante of the ante of your cake :P make a buttercream icing of medium consistency, add few drops of food colouring, ice your cake basketweave design using tip 47. Top with fresh berries and you have a jaw-droppingly-awesome cake!

Enjoy your rich, moist and really yummy choc goodness!

Cake lasts 3-4 days in room temperature :)
1 Comment

Steamed Sea Bass

7/6/2011

0 Comments

 
Picture
This dish is one of the very few dishes I braved in my first attempts in cooking. That only means this is one of the easiest that you could ever find in my must cook list.

Present this dish on a stylish plate, wooden bowl or any fancy plate and you will have a party pleaser in an instant!

I suggest you make an extra sauce just for the ones who love to have their fish well sauced.

Tip 1: Have fun with it!
 
Ingredients:
1 kilo whole sea bass with head and tail, cleaned, scaled and gils removed
1/4 cup white wine
3 cloves garlic, choppped coarsely
4 tbsps spring onion, chopped
2 tbsps fresh ginger, minced
2 teaspoons sugar
1/2 cup olive oil
3 tbsps soy sauce
2 tbsps extra white wine

Serves 3-4

Procedure:
Rinse the fish inside and out with 1/4 cup of wine

Steam the fish either in a traditional Chinese bamboo or other types of steamer for 15-20 minutes. Check on it once in awhile to make sure you don't over steam it. The skin should be pulling off quite easily but is still firm to be transferred to the serving plate.

In the meantime, prepare the sauce base by combining 2 tablespoons of wine, garlic, spring onions, ginger and sugar in a bowl.

Once the fish is cooked. Carefully remove the fish from steamer and transfer to your stylish serving plate.

Heat the oil in a wok or saucepan. When hot enough, add the sauce base. Stir until it boils.

Pour soy sauce inside and over the sea bass, then pour the boiled sauce over the fish.

Happy Eating!
0 Comments

    Fave Recipes

    I'm No Chef but I love food like it's no one's business.

    I didn't know anything about cooking... frying an egg used to be a nightmare.. until I was forced to learn more... I had my first born... that's when my gastronomic journey started...

    Join me in my food quest.
    Laugh at my embarrassing moments.
    Share my triumphs.

    And if you're brave enough ... cook with me (ooooh scary!), virtually that is, and have the most enjoyable time!

    Welcome aboard
    fellow foodies!

    Print Friendly and PDF

    Categories

    All
    Ac Spin
    Appetizer
    Baking
    Bbq
    Beef
    Bread
    Breakfast
    Butter
    Chicken
    Dairy
    Dessert
    Drink
    Entree
    Fave
    Fondant
    Gobbledtooquicklyphotosnexttime
    Halloween
    Icing And Frosting
    Lamb
    Main Course
    Marinade
    Nibbles
    Occasions
    Pasta
    Pastry
    Pork
    Poultry
    Rice
    Salad
    Sandwich
    Sauce
    Seafood
    Side Dish
    Slow Cooker
    Smoothie
    Snacks
    Soup
    Spaghetti Challenge
    Stew
    Stock
    Tapas
    Vegetables
    Workinprogress
    Zespiri Kiwifruit

    Archives

    February 2016
    January 2016
    January 2013
    November 2012
    October 2012
    September 2012
    August 2012
    July 2012
    June 2012
    May 2012
    April 2012
    March 2012
    February 2012
    September 2011
    August 2011
    July 2011
    June 2011
    May 2011
    April 2011
    February 2011
    January 2011
    December 2010
    November 2010
    October 2010
    September 2010
    August 2010

    RSS Feed

Powered by Create your own unique website with customizable templates.