Niña
​nin-ya
  • About Me
    • Contact Me
    • Tourettes
    • Geeeetar Playin'
  • My Life
  • Travel Bug-a-boo
  • Fave Recipes
    • Photo Gallery
  • Picture the Taste
  • Bright Ideas
  • Reviews
  • About Me
    • Contact Me
    • Tourettes
    • Geeeetar Playin'
  • My Life
  • Travel Bug-a-boo
  • Fave Recipes
    • Photo Gallery
  • Picture the Taste
  • Bright Ideas
  • Reviews
Niña
​nin-ya

NIÑA ​ANINIAS

SHOP. COOK. EAT.
REPEAT.

Grilled Shrimp

11/27/2010

0 Comments

 
Picture
FV35-08-1110

Nice weather brings out the urge to be with nature, soak up the sun and breathe that clean and fresh air. Best thing to do? Picnic, swimming, barbecue or anything relaxing.

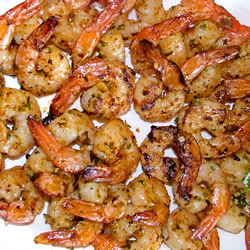
This marinated shrimp is soooo delish that I must share it!

Tip 1: Ask your fishmonger to thoroughly clean the shrimp, take off shells, veins and heads while leaving the tails intact for presentation purposes.
Tip 2: Buy the shrimps the night before and leave them in the freezer until you're ready to thaw and marinate.
Tip 3: Bear in mind the marinating shrimp must be done 2-3 hours before the cooking time as the acids in the marinate will cook them, it'll be gooey and unsightly for cooking.

This was too easy to even mention the amount of time

Ingredients:
2 cups olive oil
1/2 cup chopped fresh parsley
2 lemons, juiced
2-4 tablespoons hot pepper sauce (more or less depending on how much kick you want)
6 cloves garlic, minced
4 teaspoons dried oregano
2 teaspoons salt
2 teaspoons ground black pepper
2 kilos large shrimp, peeled and deveined with tails attached
skewers

Serves 10-12


Mix the first 8 ingredients together. Reserve some to use for basting. 

Place your cleaned shrimp in a resealable bag or bowl and pour the marinate over. Marinate for 2-3 hours. 

Thread shrimp into skewers. Lightly oil grill and start cooking! 

5 minutes to each side until shrimp colour turns opaque. don't overcook so the shrimp remains juicy and tender. 

If you want to add more spices to this basic recipe,,, go ahead!

Enjoy and happy eating!


-AcousticChef, cookin' one tune at a time!
Enjoyed this recipe? Subscribe to Fave Recipes for updates!

Enter your email address:

Delivered by FeedBurner

0 Comments

Carrot Cupcake with White Chocolate Cream Cheese Icing

11/12/2010

0 Comments

 
Picture
This is the first carrot cupcake I made and I'm very very pleased.

Tip 1: If you don't want your cupcake too sweet, then skip the icing part
Tip 2: If you do put frosting, taste a cupcake with barely-there frosting first before you go bananas and slather them all.
Tip 3: Icing ingredients makes A LOT! I'm not kidding. So, whatever is left, keep it in the fridge for next use.

INGREDIENTS
ICING - alternative frosting which I prefer, click here -->(Cream Cheese Frosting 2)

1 ounce white chocolate
4-ounce cream cheese, softened
1/2 teaspoon vanilla extract
1/4 teaspoon orange extract
2 cups confectioner's sugar
1 tablespoons heavy cream

CUPCAKE
2 eggs, lightly beaten
1 1/8 cups white sugar
1/3 cup brown sugar
1/2 cup vegetable oil
1 teaspoon vanilla extract
2 cups shredded carrots
1/2 cup crushed pineapple, I blitz it couple of times
1 1/2 cup all-purpose flour
1 1/4 teaspoon plus a dash of baking soda
1/2 teaspoon salt
3/4 teaspoon ground cinnamon
1 1/2 teaspoon ground nutmeg
1/4 teaspoon ground ginger
1 cup chopped walnuts or crushed by meat pounder :)

Makes 14 medium-sized muffins

This took me an hour.

Preheat oven to 350 degrees F. Lightly grease 12 muffin caps

For Cream Cheese Frosting:
In a double boiler, melt white chocolate over low heat. Stir until smooth, and allow to cool to room temperature.

In the first bowl, beat together the cream cheese and butter until smooth. Mix in white chocolate, vanilla, and orange extract. Gradually beat in the confectioners' sugar until the mixture is fluffy. Mix in heavy cream.

For Cupcakes:
Beat together eggs, white sugar and brown sugar in the second bowl. Add and mix-in oil and vanilla. Fold in carrots and pineapple. In the third bowl, mix flour, baking soda, salt, cinnamon, nutmeg, and ginger. Mix flour mixture into the carrot mixture until evenly moist. Fold in 1/2 cup walnuts. Transfer to the prepared muffin cups.

Bake 25 minutes in the preheated oven, or until a toothpick inserted in the center of the cupcake comes out clean. Cool completely on wire racks before topping with the icing and sprinkling with remaining walnuts.

Serve and impress! Guaranteed a yummy dessert!
0 Comments

Spaghetti Carbonara with Pork Belly and Fresh Peas

11/12/2010

0 Comments

 
Picture
FV33-06-1110

Original Recipe: Molly Stevens
Bon Appetit | April 2007

I tried this one night and I loved the concept behind it,,, but sad to say, I'm not bowled over by the whole thing. I guess it came out the way it should but it's just not that usual dish that my palette is accustomed to. It looked very appetizing, there is a wow factor when you serve it. The cream colour of the sauce, the brown of the pork and the green of the peas, it's a beautiful combination. 

I eneded up with a pasta with such a strong character. Flavours were killing each other to the finish line. Deeply flavoured pork and pungent Pecorino Romano might be too much for my delicate buds. This is very, very, very Italian and I'm pretty much Asian where everything should either be sweet or greasy :P Maybe this is how it's supposed to taste but it's just not working for me like the other Italian dishes I'm so in love with.

I'm stubborn so I'll do this again but with Pancetta, easy and more subtle than the original version.

Anywho, here is the recipe.

Tip 1: If you have no patience, don't attempt the pork belly part, just buy ready made pancetta

INGREDIENTS:
Pork Belly
1/2 teaspoon coarse sea salt
1/2 teaspoon coriander seeds, crushed
1/2 kilo fresh pork belly
1 small onion, quartered
1 small carrot, peeled, quartered
1/2 celery stalk, cut into 2-inch pieces
2 garlic cloves, peeled, smashed
1 bay leaf
1/4 teaspoon whole black peppercorns
2 tablespoons (or more) dry white wine
1/2 cup low-salt chicken broth

2 tablespoons olive oil
1 garlic clove
1/4 cup dry white wine

Spagehetti Carbonara

1/2 kilo spaghetti
1 1/2 cups fresh shelled peas or frozen petite peas, thawed
2 large eggs
1/2 cup grated Parmesan cheese, divided
1/4 cup grated Pecorino Romano cheese
1/4 cup chopped fresh Italian parsley

Serves 4-6

Pork Belly

Rub coarse salt and coriander into pork belly. Cover and chill at least 4 hours and up to 2 days.

Preheat oven to 275°F. Place pork belly in large ovenproof saucepan. Add onion, next 7 ingredients. Bring to boil, cover, and transfer to oven. Cook until pork is tender, turning every 30 minutes, about 2 hours and 15 minutes. Cool slightly. Cover and chill at least 1 day and up to 2 days.

Discard any solidified fat on surface of pork belly mixture. Remove pork from cooking liquid, scraping any gelatinous mixture back int saucepan. Rewarm mixture in saucepan. Strain liquid into measuring cup, adding white wine if necessary to measure 1/2 cup. Cut rind and all but 1/4-inch fat layer of pork belly. Slice pork cross wise in 1/2-inch slices, then cut slices crosswise into 1/2-inch thick strips.

Heat oil in large skillet over medium-high heat. Add pork belly and cook until browned on all sides, stirring often, about 7 minutes. Add garlic and saute 1 minute. Add pork cooking liquid and 1/4 cup wine. Bring to boil then cover to keep warm. Take off from direct heat.

Spaghetti Carbonara

Cook spaghetti in a pot of boiling salted water with a knob of butter until al dente, stirring occassionally. Add peas; cook for a further 1 minute.

Meanwhile, whisk eggs in large bowl. Add 1/4 cup Parmesan cheese, Pecorino Romana cheese and parsley; set aside.

Drain pasta, reserving 1 cup cooking liquid. Whisk 1/4 cup hot cooking liquid into egg misture. Add pasta; toss to coat. Add pasta mixture to skillet with pork and toss. Add more cooking liquid by tablespoons if dry. Season generously with black pepper. Divide among bowls and serve. Have the remaining 1/4 cup Parmesan cheese alongside for the taking. 


If you like strong flavours, don't mind me, cook this and enjoy!
Enjoyed this recipe? Subscribe to Fave Recipes for updates!

Enter your email address:

Delivered by FeedBurner

0 Comments

Philly Steak Sandwich with a Twist

11/8/2010

0 Comments

 
Picture
FV32-05-1110

I was hungry, it's late and we don't have dinner yet... that's my concern one night. I already had the rib eye steak at room temperature but I didn't feel like having the usual rib eye steak with mushroom gravy. First, I was bored and second, I wasn't inspired enough to whip out a steak, my hubby was not around, steak is something he loves to chomp on.

Not really had any plans but in the end I thought of a great idea for the ingredients that I have... my inspiration? Guy Fieri's Diners, Drive-ins and Dives.. He goes to the most outrageous food joints in the US and it's amazing how hungry you'll be for those mouth-watering food.

Tip 1: Use meat tenderiser powder if you think you need it.
Tip 2: Use cling wrap on top of the steak before pounding your meat senseless so you'll have less mess after 

INGREDIENTS:
Kraft cheese, single/individual packet
2 portions of rib-eye (approx 500 grams)
1 box of button mushroom, sliced
1 1/2 medium sized red onion, sliced
1/2 cup pancetta
Mini - baguette

This took me 45 minutes

Rub your steak with meat tenderiser powder, then pound each part until they've thinned a little.

Leave the meat for 30 minutes on the side. 

In the meantime, prep the rest by sweating your pancetta to the point where its crispy enough. Drop in the mushroom and saute until it's cooked. Add the onion to the pan until it's cooked and translucent. Set aside.

On the same pan, pan sear the steak until cooked, a little pink on the inside.

Rest the steak for 5-10 minutes before slicing it.

Once rested, slice the steak against the grain and on 45-degree angle.

Return the steak and pancetta mixture to the pan and stir fry a little. If you like your meat a medium rare, then take it off the pan straight away. If you want it done, then take it off when the pink's gone.

Slice your baguette and pan-grill them, sliced side face down on the grill. Once you have good marks, spread one side with good mayonnaise, top with steak slices then finish off with a slice of cheese. Place the other half baquette on top and toast it panini style until the cheese begins to melt or put it in the oven to melt the cheese.

Serve your steak sandwiches with dijon mustard on the side. You can dip whatever steak that falls off your bread.

Serve this with fries or potato wedges or a green salad of your choice. An ice cold cola doesn't hurt either.

By the way, I ate left overs of these steak the following day and boy-oh-boy! It's as good as the night it's cooked. Yum-my!
Enjoyed this recipe? Subscribe to Fave Recipes for updates!

Enter your email address:

Delivered by FeedBurner

0 Comments

Yummy Creepy Crawlies - Spider Cupcakes

11/6/2010

0 Comments

 
Picture
FV31-04-1110

Halloween is finished but a lot are still asking how the spider cupcake was made... so here it goes.

INGREDIENTS

1 chocolate cake mix or my recipe Moist Chocolate Cakes/Cupcakes
27 strawberry flavour gummy stick
36 M & M's, red or green colours
Ready made chocolate frosting or my Glaze in the German Chocolate Recipe
Chocolate sprinkles

Prepare cupcakes according to package direction.

In the meantime, cut the gummy stick into two and slice it lengthwise.

Once cupcakes are cooled down. Spread chocolate frosting on top. Insert 3 gummy stick on each side to make up the legs. Place 2 pieces of M&M's in front to create the eyes. Sprinkle with chocolate sprinkles to create hairs.

Voila, you're ready for Halloween!

Enjoyed this post? Subscribe to Fave Recipes for updates

Enter your email address:

Delivered by FeedBurner

0 Comments

Ultra Easy Appetizer Tray

11/5/2010

0 Comments

 
FV30-03-1110

This is a good appetizer tray for entertaining. It doesn't need tons of preparing, very ideal if you're already spending a bit of time in your main course

Tip 1: Buy your meat slices the night before
Tip 2: Buy ready sliced or minced onion if it's available but make sure to use these within 2 days
Tip 3: Jam can be made the night before
Tip 4: Have at least couple of baguettes or baby french sticks in your freezer, ready for later use.

Ingredients:
Mushroom and Bacon Jam (recipe on site)
slices of prosciutto
brine-cured green and black olives
cucumber, sliced
sun-dried tomatoes
Garlic Bruschettas (recipe on site)
Mushroom and Spinach Frittata (recipe on site)

Serves 4

This takes a jif to make


On your serving tray, place your brushcetta, slices of prosciutto, brine-cured green and black olives, slices of cucumbers, sun-dried tomatoes, a serving bowl of mushroom and bacon jam in the middle. You can add ready made green pesto and bread sticks on the serving plate if you wish or have serviette's ready with funky toothpicks.

Appetizing it is!

(photos will follow when I re-do this)
Enjoyed this recipe? Subscribe to Fave Recipes for updates!

Enter your email address:

Delivered by FeedBurner

0 Comments

Garlic Bruschettas

11/5/2010

0 Comments

 
FV29-02-1110

This is a perfect partner to mushroom and bacon jam, pesto, slice meat, almost everything! Also great as an accompaniment to pastas.

INGREDIENTS
baby - french bread sticks or baguette
3 ounce butter
2 clove garlic

Serves 4
309 Calories per Serving


15 minutes, not another minute long

Preheat oven to 150 degrees celcius.

Cut frozen bread to thin slices 1/2 to 3/4 inch width.

Melt butter with crushed garlic over low heat, or microwave. Brush both sides of the bread with butter using a pastry brush.

Place on a baking tray, preferably pizza tray with holes.

Bake for 7-10 minutes until just golden, keep an eye because it burns quickly

Enjoyed this recipe? Subscribe to Fave Recipes for updates!

Enter your email address:

Delivered by FeedBurner

0 Comments

Mushroom and Bacon Jam

11/5/2010

0 Comments

 
Picture
FV28-01-1110

This is one easy concoction that is absolutely fantastic with a toasted bread or bread stick or garlic bruschetta. Great for appetizer that doesn't need so much prepping.

Tip 1: If you like pancetta instead of bacon, your choice.
Tip 2: Important part of my Philly Steak Sandwich

Ingredients:
8 good quality streaky bacon, diced
2 punnets of mixed mushroom (i.e. oyster, portabello, button mushroom
3 ounce butter
1 small red onion, chopped
1 clove garlic, minced

Heat 1 ounce butter into the pan and sweat onions and garlic for a few minutes.

Add the bacon and cook for a few more minutes then add the mushrooms together with the remaining butter.

Season, turn the heat right down and cook for 10-15 minutes. If the mixture starts getting dry, add a little lemon juice.

Serves 4
375 Calories per serving

*More photos will be posted when I remember to take pictures of it! Excuse my senile moments
Enjoyed this post? Subscribe to Fave Recipes for updates!

Enter your email address:

Delivered by FeedBurner

0 Comments

    Fave Recipes

    I'm No Chef but I love food like it's no one's business.

    I didn't know anything about cooking... frying an egg used to be a nightmare.. until I was forced to learn more... I had my first born... that's when my gastronomic journey started...

    Join me in my food quest.
    Laugh at my embarrassing moments.
    Share my triumphs.

    And if you're brave enough ... cook with me (ooooh scary!), virtually that is, and have the most enjoyable time!

    Welcome aboard
    fellow foodies!

    Print Friendly and PDF

    Categories

    All
    Ac Spin
    Appetizer
    Baking
    Bbq
    Beef
    Bread
    Breakfast
    Butter
    Chicken
    Dairy
    Dessert
    Drink
    Entree
    Fave
    Fondant
    Gobbledtooquicklyphotosnexttime
    Halloween
    Icing And Frosting
    Lamb
    Main Course
    Marinade
    Nibbles
    Occasions
    Pasta
    Pastry
    Pork
    Poultry
    Rice
    Salad
    Sandwich
    Sauce
    Seafood
    Side Dish
    Slow Cooker
    Smoothie
    Snacks
    Soup
    Spaghetti Challenge
    Stew
    Stock
    Tapas
    Vegetables
    Workinprogress
    Zespiri Kiwifruit

    Archives

    February 2016
    January 2016
    January 2013
    November 2012
    October 2012
    September 2012
    August 2012
    July 2012
    June 2012
    May 2012
    April 2012
    March 2012
    February 2012
    September 2011
    August 2011
    July 2011
    June 2011
    May 2011
    April 2011
    February 2011
    January 2011
    December 2010
    November 2010
    October 2010
    September 2010
    August 2010

    RSS Feed

Powered by Create your own unique website with customizable templates.