Niña
​nin-ya
  • About Me
    • Contact Me
    • Tourettes
    • Geeeetar Playin'
  • My Life
  • Travel Bug-a-boo
  • Fave Recipes
    • Photo Gallery
  • Picture the Taste
  • Bright Ideas
  • Reviews
  • About Me
    • Contact Me
    • Tourettes
    • Geeeetar Playin'
  • My Life
  • Travel Bug-a-boo
  • Fave Recipes
    • Photo Gallery
  • Picture the Taste
  • Bright Ideas
  • Reviews
Niña
​nin-ya

NIÑA ​ANINIAS

SHOP. COOK. EAT.
REPEAT.

Beef in Oyster Sauce

6/22/2012

0 Comments

 
Picture
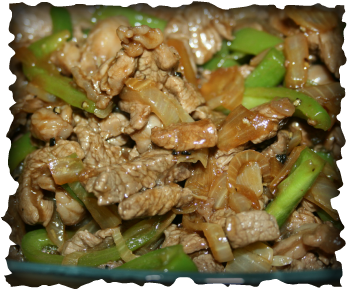
This is my brother's nanny's dish which our nanny most prolly modified to our tastebuds. Soooo delish, especially with steamed white rice.

My kids and their nanny went to my brother's house and so it's just me and hubby and in as much as I love hubby so much, I couldn't cook as flamboyant as I want to since today is one of those days that I'm down with a really bad flu. Mind you, I rarely have flu. Twice a year is my quota, knock on wood.

I'm so happy with how I managed to cook this dish that though can't taste much, I eat a lot!

This dish is so simple, it's a matter of cooking the beef tender and having the sauce balance.

Ingredients:
500 grams beef rib-eye
tenderiser powder
1 tablespoon lemon
2 tablespoons olive oil
knob of butter
1 medium size green capsicum / bell pepper, cut in strips
1 medium white onion, sliced
1/2 cup oyster sauce
3/4 cup to 1 cup water
Mushroom slices, optional

Directions:

Massage the beef with tenderiser powder, cover with cling film and pound slightly. Slice into strips and squeeze about a tablespoon of lemon juice. Toss to make sure that all the pieces are well marinated. Set it aside for 15 minutes. This process will help tenderize your beef completely.

Heat olive oil with a tablespoon of butter in a frying pan over high heat. Add onions. Once onions are soft, add beef strips. Stir after 30 seconds and let it simmer for 2 minutes.

Set the meat aside in a serving bowl along with onions and bell pepper. Simmer the sauce in the pan for another 3 minutes.

Pour the sauce on meat and serve. Enjoy!
0 Comments

Peanut Butter and Chocolate Mallow Crispies

6/19/2012

0 Comments

 
Picture
I have always wanted to make something out of rice crispies and mallows and this couldn't be any perfect. I still want to try some twists on this but this basic one is practically what I was looking for.

Tip 1: If you have a ready to use tempered chocolate, then use it for added crispiness
Tip 2: Adjust peanut butter according to your taste but keep in mind that this helps the chocolate to set so if you use considerably less peanut butter then the chocolate might be too syrupy,,, unless of course you're using tempered chocolate.
Tip 3: If you want the bars sweeter, then add additional 1/4 cup sugar to the ingredients

Ingredients:
1/2 cup unsalted butter, softened
1/2 cup sugar
2 large eggs
1 teaspoon vanilla
3/4 cup all purpose flour
2 tablespoons cocoa powder
1/4 teaspoon baking powder
1/4 teaspoon salt
2 cups mini marshmallows
1 cup semi-sweet chocolate chips
3/4 cup creamy peanut butter
1 1/2 cups rice krispies

Directions:
Preheat oven to 350F. Grease 9 x 13 inches pan, line the bottom with baking paper and set aside.

In a bowl, cream butter and sugar. Beat in eggs one at a time. Add vanilla and stir.

Add flour, cocoa powder, baking powder and salt.

Spread batter into prepared pan. Bake for exactly 15 minutes.

Evenly layer top with marshmallows. Return to oven and bake for another 3 minutes. Cool on cooling rack.

In the meantime, melt chocolate chips and peanut butter in a pan over low heat. Stir to melt the chips and combine peanut butter completely. Pour in rice krispies and spread the mixture over the marshmallow.

Rest for 10 minutes. Chill in the refrigerator for half an hour or until the chocolate is set. 

Cut into bars and serve.
0 Comments

Cake Pops

6/13/2012

0 Comments

 
Picture
I was just gonna make this a Picture Recipe but decided against it. I have seen too many recipes and video how-tos that suggest using cake out of the box. I mean, yes it's not a bad idea but seriously? If you're not a child... out of the box cake is a let down of any adult's skills.

This foundation cake is not sweet at all, so perfect for decoration since we all know how sweet most icings are. This cake will complement your icing like burgers and french fries.

Ingredients:
125 grams dark chocolate
125 grams butter
250 grams caster sugar
350 grams self-raising flour
1 tablespoon cocoa powder
1 teaspoon baking soda
1 tablespoon white vinegar
250 ml milk
2 medium eggs

Directions To Bake:
Preheat the oven to 160C.

In a mixing bowl, sift, self-raising flour, sugar, cocoa powder, baking soda.

in a separate bowl, add vinegar into the milk, cultivate for 5 minutes. Add eggs and beat well.

Break up the chocolate into a double boiler or a large bowl on top of a pan with simmering water. Help the melting process a little bit with a teaspoon butter. Once chocolate is melted, take it off the heat and add the rest of the butter to the chocolate. Stir until smooth. Cool for 5 minutes.

Add chocolate mixture into the dry sifted ingredients (flour, sugar, cocoa and baking soda). Add milk and vinegar concoction and beat until it's smooth.

Divide the batter into the pan and bake for 1 hour and 15 minutes or until inserted skewer comes out clean. Start checking after 1 hour.

Cool in the pan for 10 minutes then turn out on a wire rack to cool completely.

Cut it into 4 portions. Over a big bowl, rub 2 portions against each other to create small and even crumbs. If some big chunks come off your cake, just use your fingers to crumb them smaller.

To Mold:
Using icing of your choice, add some blob of it to the crumbs until it starts binding. I'll leave the amount to your judgment because different icings have different consistencies. Let's just say not too saggy wet that it will fall apart and not to dry else it'll crack when you coat it... should be just the right consistency that you can form a ball. Mold one, if you're happy with it and you think it'll hold then that's it... if it's either way then modify until you get the right texture.

Use two tablesppons of cake crumbs to make a decent size cake balls. Roll it on your hands until the sides are smooth. Line a shallow cake pan with wax paper. Rest your cake balls on it. Put the pan in the fridge to toughen the balls a little bit. Some keeps them in freezers but I personally prefer just the fridge especially if I can coat it as soon as it hardens a bit.

To Coat:
Take the cake balls out of the fridge.

Place chocolate melts in a microwaveable dish and power it up for 1 - 2 minutes. Stir after a minute to make sure it is melting evenly.

Dip your stick 2 inches into the melted chocolates. This will serve as a glue. Insert the dipped stick into the center of the ball, just before you hit the center of the ball. Pushing it farther will break the top of the ball and you dont want that

Holding the stick 180 degrees. Dip the ball ensuring it's fully covered with chocolate melts. Either by using a teaspoon to assist with the coating or by gently rocking the balls on each side. Don't stir the melt with the ball because it will loosen the stick in the center... you sould just rock it gently. Lift the ball straight, dripping excess chocolate melts on top. If you think the coating is still a bit thick on the sides, hold the stick approximately 80 degrees, while slowly rotating the stick, tap the holding palm of your hand with the other hand gently. The excess will drip on the sides. 

Before the melts hardens, you can decorate with confetti of sprinkles or a dripping of contrasting colours.

Perching the sticks on a styrofoam will keep it secure and dry. 
0 Comments

Stir-fried Noodles

6/12/2012

0 Comments

 
Picture
Stir-fried noodles or pancit is a staple for us back home. Not so much in my house but once in awhile it's nice to have it as part of a meal or have it as a snack with bread.

This noodles are especially perfect for glazed chicken wings which I recently discovered. YUM. So here it goes.

Tip 1: Any meat can be used, prawn, chicken, beef
Tip 2: Adjust the saltiness to your preference.
Tip 3: This amount is for big gatherings, if you're only cooking this for a simple meal, then cut the ingredients in half.

Ingredients:
50 grams rice noodles
1 large size onion, chopped
4 cloves garlic, minced
2 tablespoons olive oil
250 grams pork, sliced lengthwise, tossed in 1 tablespoon soy sauce
Salt and pepper to taste
3-4 tablespoons soya sauce
2 large carrot, sliced lengthwise
500 grams yellow Chinese Noodles
1 medium size cabbage, shredded
1 litre water

10 generous servings

Directions:
Soak rice noodles in warm water for 5 minutes. Drain and set aside.

In a large wok, saute onion and garlic in oil. Add pork bits. Salt and pepper to taste.

Add soya sauce and all vegetables to the wok. Cook for 2 minutes.

Add water. Bring to a boil for a minute.

Drain the vegetables & meat and set aside while returning the liquid to the pan.

Add both noodles to the pan. Mix well and cover. Let it simmer for 5 minutes.

Return vegetables and meat to noodles. Toss to mix well.

Photos next time!
0 Comments

Glazed Chicken Wings On Stir-Fried Noodles

6/9/2012

0 Comments

 
Picture
The star of this dish is the wings. You can eat it with rice, with noodles, with french fries, with whatever you want to eat it with.

There are so many great things about this dish. The awesome glaze has a taste that will please any age, it's so versatile, it's super easy that you can do other things while the wings are cooking and it is inexpensive. Dish doesn't have to be expensive to taste great.

When you're single you don't think much about how much money you spend but when you have a family, you prioritize. I think unless you're sweating money through your pores, you know exactly what I mean. Although I'm still working on this whole theory as of right now, food is my addiction... not bags, not clothes, not shoes... food. I have to constantly argue and debate with myself why I shouldn't buy that ingredient... most of the time... the evil foodie prevails... "it is worth it! when you bite on it, you know it's worth it".

This dish.... entails no argument.

Ingredients:
2 kilos chicken wings
2 tablespoons olive oil
1/2 teaspoon salt
1/2 teaspoon black pepper
3/4 cup balsamic vinegar
1/4 cup soy sauce
2 teaspoons sugar
1 tablespoon butter
1 tablespoon toasted sesame seeds

Directions:

Line two shallow baking pans with aluminum foil. Put pans in the oven and preheat oven to 500F.

Make sure your wings are pat dry. Toss them in oil, salt and pepper and spread wings on preheated pans making sure there's no overlapping. 1 layer clean.

Roast WITHOUT TURNING! 30 minutes until golden and tender.

Whing wings are roasing. Simmer vinegar, soy sauce and sugar in a saucepan. Stir occassionally. Reduce to about 1/3 cup, approximately 12 minutes.

Remove from heat and add butter. Stir until melted.

Once wings are done, take if out off the oven and let it rest on the pan for a minute. Transfer to a clean bowl. Pour the glaze over and toss to coat well. Let is rest for some 3-5 minutes and then toss again. Sprinkle with toasted sesame seeds and serve on top of stir-fried noodles.

Will post stir-fried noodles recipe soon!
0 Comments

Victoria Sponge Cake

6/8/2012

1 Comment

 
Picture
Last week was the Diamond Jubilee Celebration for the Queen of England... oh no... I'm definitely not British now am I living anywhere close... but... The Queen of England is not just any Queen in this lifetime and it must be commemmorated in some way... and so I baked a cake that screams Brittania.

Divine way to use fresh berries I tell you. This is not really a kids' cake with all the tartness it offers... it's cake for the big boys and girls. Tart and Sweet, Creamy and Spongy... definitely healthier than most chocolate cakes I've made.

Every bite is a burst of flavour. It is freshness at its best... crisp and unadulterated.

Ingredients:
175 grams butter, softened
175 grams caster sugar
3 eggs, beaten
175 grams self-raising flour, sifted
1 cup whipping cream
1 tablespoon icing sugar

Procedures - Baking:
Heat the oven to 180C. Grease two 20cm baking tins and line with greaseproof paper.

Beat together butter and sugar until the mixture looks pale and fluffy. Gradually add in beaten eggs, beating well between each addition. Then, fold the flour.

Divide the mixture between the two tins and bake for 20 minutes or until firm to the touch. Cool in tins for two minutes, then remove and cool completely on a wire rack.

Procedures - Whipped Cream:
Beat whipping cream and icing sugar until fluffy but not stiff.

Procedures - Assembling:
Once the cakes are cool, spread the flat side of cake with freshly whipped cream. Top with slices of strawberries and whole blueberries.

Gently pressed down with the other layer of cake. Spread with some more whipped cream and finished off with berries of your choice. I love them all and so I put as many strawberries, blueberries, blackberries, and most especially, the yummiest of them all... raspberries.

Tried to copy Union Jack... it was close.. so I'm pretty happy with it.

Tuck in!

-AcousticChef, cookin one tune at a time
1 Comment

    Fave Recipes

    I'm No Chef but I love food like it's no one's business.

    I didn't know anything about cooking... frying an egg used to be a nightmare.. until I was forced to learn more... I had my first born... that's when my gastronomic journey started...

    Join me in my food quest.
    Laugh at my embarrassing moments.
    Share my triumphs.

    And if you're brave enough ... cook with me (ooooh scary!), virtually that is, and have the most enjoyable time!

    Welcome aboard
    fellow foodies!

    Print Friendly and PDF

    Categories

    All
    Ac Spin
    Appetizer
    Baking
    Bbq
    Beef
    Bread
    Breakfast
    Butter
    Chicken
    Dairy
    Dessert
    Drink
    Entree
    Fave
    Fondant
    Gobbledtooquicklyphotosnexttime
    Halloween
    Icing And Frosting
    Lamb
    Main Course
    Marinade
    Nibbles
    Occasions
    Pasta
    Pastry
    Pork
    Poultry
    Rice
    Salad
    Sandwich
    Sauce
    Seafood
    Side Dish
    Slow Cooker
    Smoothie
    Snacks
    Soup
    Spaghetti Challenge
    Stew
    Stock
    Tapas
    Vegetables
    Workinprogress
    Zespiri Kiwifruit

    Archives

    February 2016
    January 2016
    January 2013
    November 2012
    October 2012
    September 2012
    August 2012
    July 2012
    June 2012
    May 2012
    April 2012
    March 2012
    February 2012
    September 2011
    August 2011
    July 2011
    June 2011
    May 2011
    April 2011
    February 2011
    January 2011
    December 2010
    November 2010
    October 2010
    September 2010
    August 2010

    RSS Feed

Powered by Create your own unique website with customizable templates.