Niña
​nin-ya
  • About Me
    • Contact Me
    • Tourettes
    • Geeeetar Playin'
  • My Life
  • Travel Bug-a-boo
  • Fave Recipes
    • Photo Gallery
  • Picture the Taste
  • Bright Ideas
  • Reviews
  • About Me
    • Contact Me
    • Tourettes
    • Geeeetar Playin'
  • My Life
  • Travel Bug-a-boo
  • Fave Recipes
    • Photo Gallery
  • Picture the Taste
  • Bright Ideas
  • Reviews
Niña
​nin-ya

NIÑA ​ANINIAS

SHOP. COOK. EAT.
REPEAT.

Hawaiian Birthday Cake... Aloha!

8/28/2011

0 Comments

 
Picture
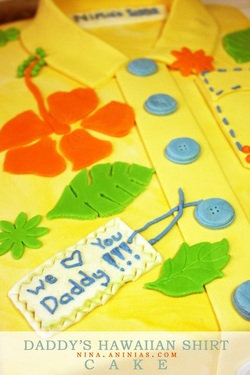
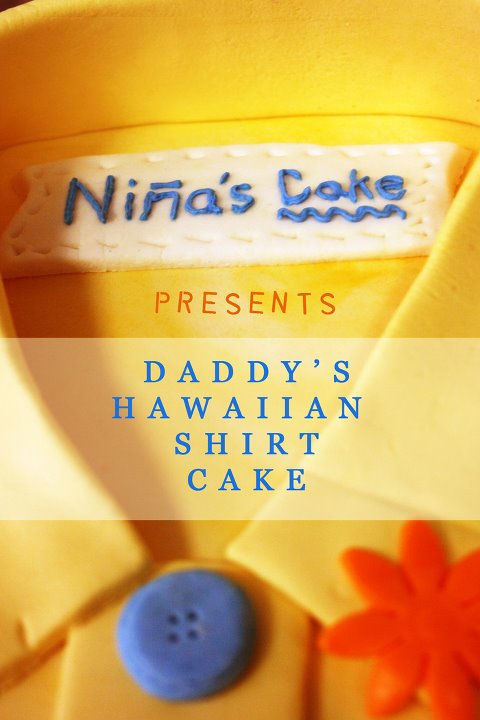
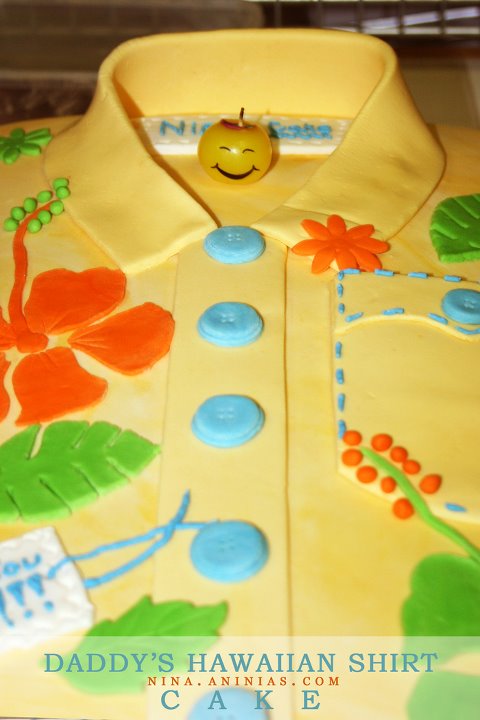
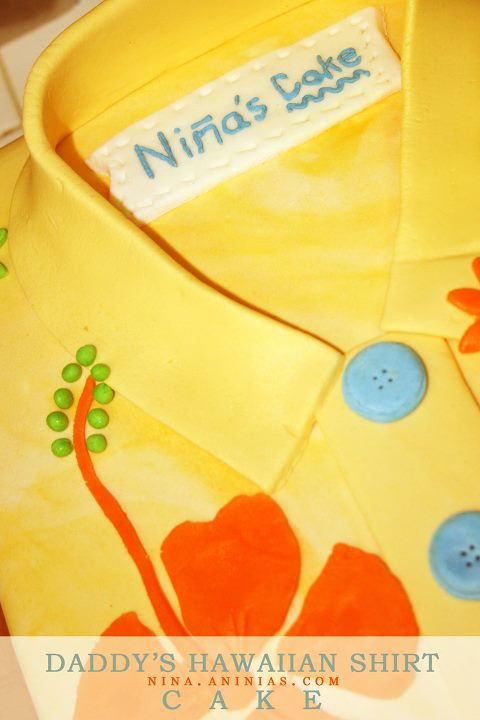
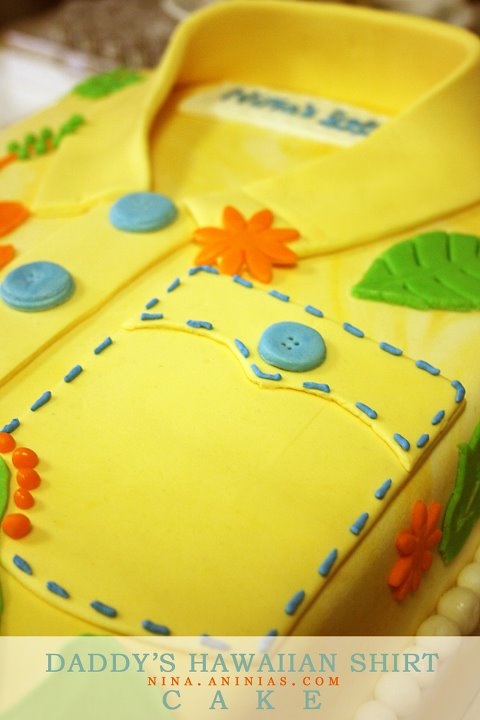
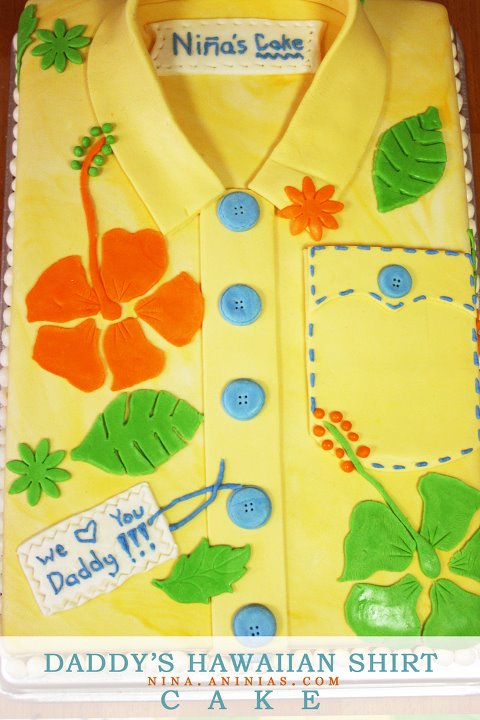
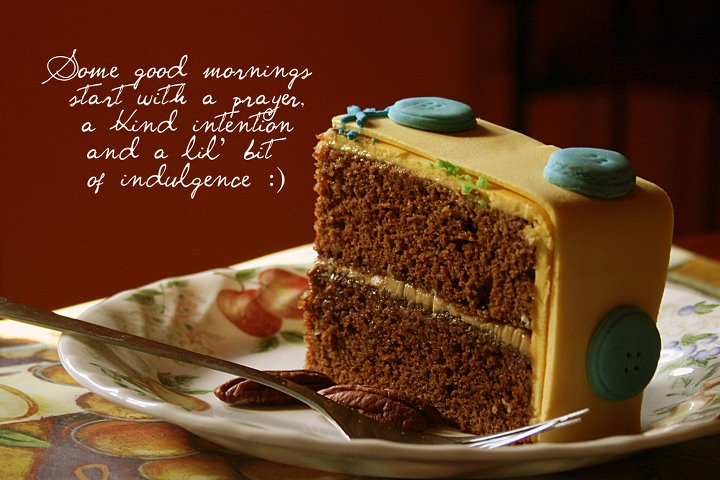
Hawaiian Shirt Birthday Cake for my hubby. Moist Rich Chocolate Cake with coffee buttercream and slivers and slivers of almond.

Recipes used:
Moist Rich Chocolate Cake
Coffee Buttercream
Rolled Fondant Icing
0 Comments

Pan de Sal !!!

8/17/2011

4 Comments

 
Picture
Credits: Thanks Ate Mi for sharing this amazing recipe...

Pan de Sal is like dinner rolls but I'm biased so I'd say it's fluffier and tastier than your usual dinner rolls.

I grew up with Pan de Sal. I ate it almost every single time, definitely not as dinner rolls, mostly, at breakfast, afternoon snack, or just when I'm bored and wants to have a nibble.

We eat it different ways. Plain, with jams, with savoury stuffing in it, as an accompaniment to stir fry noodles, with bacon, egg or hotdogs, to eat left over food that has sauce to soak the bread with ... this bread is sooo versatile that the next time I make one, I'm literally going to stuff it.

Traditionally, it's baked in a stone oven... the proper horno. Pan de Sal baked from conventional oven tastes great but traditional oven is pleasantly unique. But, for the time being, my humble oven will do... hope it won't complain of over fatigue. Seems like this is going to be a family favourite... my youngest is already hooked on it.

It took me at least a year to muster the courage to bake pan de sal... no regrets... just happy I didn't jump the gun with some lame recipe... this one really works!

Tip 1: Be patient, your dough will come together
Tip 2: Make sure your yeast gets properly proofed. Your milk should not be too hot nor too cold. If you can't stick your finger in it, it means it's too hot. It should be blood temperature. 
Tip 3: Add a cup or more flour to help form the dough. You want your dough pliable... but not wet. You're going to go by touch, it can't be dry too.
Tip 4: Your pan de sal doesn't have to be all uniform.... it's home made! you want it to be as rustic as a home-made should look like... if you want it uniform... might as well buy it from the bakeshops.

Ingredients:
yeast mixture
1 cup lukewarm milk
1 tbsp sugar
1 tbsp active dry yeast

dry ingredients
5 cups bread flour
1 1/2 tsp salt
1 cup sugar

milk mixture
1 cup milk
1/2 stick butter or 60 grams, cut into small pieces
extra 1/2 cup milk 
1 egg

extra 1 - 1 1/2 cup bread flour

bread crumbs

Makes 20 pan de sals

Procedures:
Add 1 tbsp yeast and 1 tbsp sugar to the lukewarm milk. Stir and let it sit for 15 minutes. It should have a beer-foam appearance on top after the wait, if it doesn't then the yeast did not activate and you must re-do the mixture.

In a microwavable bowl, combine milk and butter pieces together. Heat for 1 1/2 minutes. Mix and make sure all the butter is melted. Add the remaining half cup milk and 1 egg, then beat a little.

Add your yeast mixture to the milk mixture, stir a little until just combined.

Add the liquid mixture to the dry ingredients.

Using a wooden spatula, start folding until dough starts to form. At some point, you'll be ditching the spatula and will start mixing with your hand for about 8 minutes or at least until the dough starts clearing the sides of your bowl by gradually adding additional 1 cup to 1 1/2 cup extra bread flour.

Transfer your dough to a lightly floured surface and knead the dough further. When it no longer clings to your fingers and becomes elastic, form a clean ball and return to your bowl. Cover with damp cheesecloth or towel and rest for one hour.

Transfer the dough again to a lightly floured surface and knead a little more to knock out the air. Rest for another 30 minutes (you can skip this middle resting if you want). Divide into 3 portions.

Work on each portion by flattening it to 1/2 inch thick and 11 inches wide rectangle.

Roll the wide side towards you, tucking the seams with your palms until you have a semi log.

Cut to 1 inch to 1 1/2 inches portion, making 6-7 individual rolls per big portion.

Roll your individual portions onto bread crumbs and place on your baking sheet with the cut sides on top and bottom.

Place them half inch apart so when it bakes, it will rise high enough and will be fluffier than if it's too far apart. Rest for another 1 hour to let the dough expand a little bit more.

Bake in a pre-heated oven on 350 degrees for 15 minutes or until your preferred colour, pale, golden brown, brown.

Fresh from the oven, open one and see how soft and fluffy your creation is! Enjoy your home made pan de sal that will beat any commercially made ones...!

Happy eating!

My first attempt on my beloved pan de sal... pretty much a disaster... as they say, practice makes perfect, so I'm practicing!

My second attempt, soooo much better... yipee!
4 Comments

Churros

8/11/2011

0 Comments

 
Picture
I've always been intrigued of how Churros are made, especially how Churros taste. I know it's the Latin version of doughnut, but for me, there's really no other way of getting introduced to a dish but to make them and taste them right after it's made.

Ingredients:
Dough
1 cup water
1 1/2 tablespoons sugar
1 teaspoon salt
1 tablespoon vegetable oil
1 cup all purpose flour
1 egg

4 cups oil for deep frying

Coat
1 cup white sugar
1 teaspoon ground cinnamon

Makes 24 sticks of 4-inch churros

Procedures:
Mix the coating in a medium mixing bowl or zip loc bag and set aside.

In a medium saucepan, heat your oil for deep frying until it reaches almost 380 degrees F.

While your oil is heating up, mix your dough in another medium saucepan on a medium high heat. Add, water, sugar, salt and vegetable oil, stir and let it reach the rolling boil stage.

Turn off the heat, add your flour and vigorously mix until a ball is formed. Rest for five minutes and re-mix with one whole egg.

Place the dough mix in a pastry bag with a 2D star tip for easy piping.

Once the oil is hot enough, start piping out 4-inch long churros strip directly into the oil. Don't overcrowd your pan to ensure you maintain the temperature for deep frying. If you use 2D tip, you only need 2 minutes per stick, otherwise you'll need to do a trial and error for thicker sticks.

Drain your churros on a kitchen towel and transfer to your coating mixture. Toss until its fully coated.

Serve your churros with hot chocolate for dipping or sipping and enjoy!

Happy Eating! 

  
0 Comments

Menudo

8/8/2011

3 Comments

 
Picture
There is a Mexican version of Menudo which is a soup containing beef stomach.

This version is the stew version made from a whole other ingredients which would have been heavily influence by the Spaniards.

Our Menudo is best eaten with steamed rice or bread to soak the sauce, like pan de sal, ciabatta, or whatever bread you fancy.

Ingredients:
1 kilo pork loin, cut into small pieces
250 grams pork liver, cut into small pieces
1 cup potatoes, diced
1 cup carrots, diced
1 cup red capsicum or bell pepper
1/3 cup soy sauce
1/3 cup lemon juice
1 onion, minced
3 garlic cloves, minced
2 tsp brown sugar
2 cups tomato sauce
1 cup water
1/8 cup cooking oil

Serves 8

Procedure:
To add depth to your menudo and to ensure your pork is tender, marinade the meat with soy sauce and lemon juice for one hour.

In a big sauce pan, heat the oil and fry potatoes and carrots until half cooked. Approximately 5 minutes or so. Fish out the potatoes and carrots and set them aside.

On the same pan, saute the garlic and onion. Add pork and water, then simmer for about 10 to 15 minutes, until the pork is tender.

Add liver, tomato sauce, half cooked carrots and potatoes, bell pepper, brown sugar and simmer for further 5 to 8 minutes. 

If you prefer, at this stage, you can add, raisins, green peas or chick peas (garbanzos).

Voila! Your very own tasty Menudo. Happy Eating!!!

-AcousticChef.... cookin' one tune at a time!
3 Comments

Chili Chicken Wings with Salt and Lemon

8/3/2011

0 Comments

 
Picture
I love chicken wings... it's good for snacks, it's great with fizzy drinks, spirits, juice, or whatever you feel like gulping. I love that it's finger food, you can just get down to business, no need for a knife, you just need a lot of serviettes though... right after you go finger-lickin good.

The way it's cooked is ingenious! I've never deep fried something that doesn't spat at me at least 3 or 4 times. It's like dancing around while lightning strikes when it happens. I know you're supposed to pat dry the meat before deep frying but let's just say... as I've said... I always like shortcuts so... no, I don't normally pat them dry.

With the way the chicken is first steamed then gloriously coated with flour and spices, deep frying it is like a bliss! I bet this method will work really, really, well with other meat!

Tip 1: if you still don't have a steamer until now,,, please get one. There's so many fun recipes you can do with it.. 
Tip 2: have fun, this dish is for peeps who only knows how to boil an egg :)
Tip 3: if you want your chix mildly hot, go for cayenne powder. I would have loved the kick of chili powder though but I didn't have so I had to go for cayenne.
Tip 4: if you're only going to use the fresh chilies for garnish, then small ones will do... if you want to munch it like crisps, then go for large ones.

Ingredients:
500 grams chicken wings
1/3 cup plain all purpose flour
1 1/2 tablespoons chili powder
1 1/2 tablespoons sea salt
4 chilies, cut in half lengthways, deseeded
1/4 cup spring onion, either preferably julienned if not, chopped will work too
1 lemon, halved


Steam your chicken for a good 10 minutes. This will ensure you kickstart the cooking so deep frying stage will mostly be for the skin and its coating.

Drain away excess liquid, if your steamer is slotted, then you won't have much water to take care of. Let it cool on the side while you work on your coating.

Mix flour, salt, chilli powder in a good sized bowl. Add your chicken wings and toss. If you have a lot, then work on it in batches. Shake off excess flour, if you like thick coating then leave it as is.

Heat your oil to almost 380 degrees F, if you don't have a candy thermometer, then just make sure it's hot enough for frying.

Start frying your wings. 5 minutes for small chicken wings like what I used. 10 minutes for jumbo ones. Fish them all out of the fryer and drain on kitchen towel.

On the same pan, fry your fresh chilli halves.

Arrange your chicken on a serving plate, top it with fried chillies and garnish it some more with your spring onions. Either you give your chix a squeeze of lemon or just place the lemon halves on the side, your guest can choose whether to have the lemons added or not.

Happy Eating!

0 Comments

Cheesecake Galore!

8/3/2011

3 Comments

 
Picture
I thought I will keep this recipe for myself but what's the joy in that?

So, I'm gloriously sharing it to all.

Ingredients:
Crust:
2 1/3 cups Graham Cracker Crumbs
1/2 cup
1/4 cup sugar

Fillings:
900 grams cream cheese
1 1/2 cups sugar
1/4 cup all purpose flour
5 large eggs (or 7 small-to-medium ones)
460 grams sour cream
1/4 cup milk
1 tablespoon vanilla extract

Toppings:
1 cup fresh blueberries
1/4 cup sugar
1 cup ready-made blueberry toppings
1 1/2 teaspoons cornstarch diluted in 2 tablespoons cold water

Makes one 10-inch cheesecakes or 
five 4-inch crust and 10 4-inch cheesecake fillings (so you might want to double your crust for mini pans). 

Procedure:

Crust:
Preheat oven to 375 degrees F. Prepare your springform pan by wrapping the outer part with aluminum foil.

Using a food processor, mix all ingredients until it's well combined and moist. Press crumb mixture onto the bottom of the pan and on the sides, 2 inches for 10-inch cake and an inch will be enough for a 4-inch cake.

Bake until it starts to brown, 8-10 minutes. Set your crust aside and let cool.

Filling
Beat cream cheese and sugar in your mixing bowl (either by stand alone mixer or hand mixer). Beat in flour, then add one egg at a time. Add the sour cream, milk and vanilla.

Pour the filling into the crust or ladle if you are making mini-cheesecakes.

Place the pan(s) in a large roasting pan. Pour hot water into the roasting pan until it reaches an inch or so of the springform pans' side. 

Bake cheesecake until it's just set in the center, golden brown, 1 hour for 10-inch cake, 15-20 minutes for 4-inch mini-cakes.

Refrigerate for 6 hours before adding toppings.

Toppings:
In medium  high heat, heat the fresh blueberries, starch and sugar until it is completely dissolved. Boil until the mixture thickens. Stir in 1 cup ready-made bluerry toppings and heat for a few seconds. Cool the mixture before spreading it on top of your cheesecake.

Refrigerate your cheesecake with toppings for 2 hours if you want your toppings to run a little bit on the side when you release it from the pan. If you want it to be fully set, then refrigerate it longer until toppings are fully set.

You can add whichever toppings you like, I tried it with Blueberries, Strawberries and even Lemon Icing... go nuts ... be experimental and have fun!

Happy Baking!!!

3 Comments

Hot Bun - Char Siu Bao / Siopao I

8/1/2011

0 Comments

 
Picture
Siopao is from the Chinese influence in my country. It's pretty much the same as Hong Kong hot buns. Obviously, we have to tweak it to our palate, which is also influenced by the Spaniards, thus the name, Sio-pao Asado :)

I always love siopao and buy it whenever I have the chance. So when I heard my cousins and sis-in-law proudly made one, I got inspired to try it myself.

It wasn't easy, I did made lots of booboos but I now know where I made my mistakes.

Tip 1: Make sure the meat you use is lean (this is my booboo). First, the fat will make your mixture oily. Second, when the fat disintegrates, there will not be enough meat to soak up the sauce, hence the end result will be on the salty side (another booboo).
Tip 2: 5 cups of all purpose flour is the starting point. You must add some more until you reach the right texture. You'll know when it is no longer sticky and it holds its shape. This is important so the crimps will stay as is until you steam your siopao. This is my other booboo, I was too impatient to wait for the right texture. So, when I crimped the sides, it merged instead of holding shape. The end result of my siopao became a smooth one instead of having the twisted rydges on top.
Tip 3: You can have your meat, pork, beef or chicken... can even use shrimp (though I haven't tried shrimp yet)
Tip 4: Make sure your yeast proof properly. Warm water means blood temperature. Not too hot and not too cold. If you can't put your finger in the water, then it's too hot.
Tip 5: Rest your dough in the oven (make sure it's not on). Place a hot water in a separate bowl next to it. This will help the dough rise faster.

Ingredients:
Dough:
2 cups warm water
2 1/2 tbsp sugar (to be added to the yeast)
2 1/4 tsp dry yeast
5 cups all purpose flour
1/2 cup sugar (to be added to the flour)
1 1/4 tbsp baking powder
6 tbsp lard

Filling:
910 grams meat, chopped into small pieces
3 tbsp lard
2 tbsp garlic, minced
1 large onion, minced
2 tbsp cornstarch
3 tbsp soy sauce
4 tbsp sugar
2.5 tbsp oyster sauce
1 tbsp hoisin sauce

Sauce:
1 beef broth cube
2 tbsp corn starch diluted in a 4 tblsps of cold water
1/4 cup diced onions
2 cloves diced garlic
Fresh ground black pepper
4 tbsps brown sugar
2 tbsps soy sauce
1 tbsp Worcestershire sauce
1 teaspoon salt

Filling Procedure:
Heat the shortening in a pan. Saute the garlic and onions. Add the meat and cook until the colour turns light brown. 

Add the soy sauce, oyster sauce, hoisin sauce and sugar. Mix well and simmer for 30 minutes. Put in the corn starch diluted in cold water.

Continue cooking until the mixture becomes thick. Set aside to cool. 

Dough Procedure:
Proof your yeast by, adding yeast and sugar to your warm water in a bowl. Mix well. Rest for 10 to 15 minutes. The yeast mixture must bubble on top resembling a foam on a beer.

In another mixing bowl, put in the flour, baking powder, lard, sugar and the yeast mixture.

Knead the combined mixture until the texture of the dough becomes fine and less sticky. Cover your bowl with a wet towel and let it rest for at least an hour, to rise.

Knead the dough again then cut it into individual slices. Makes 20 individual slices.

Sauce Procedure:
Place 2 cups of water in a saucepan. Boil and add the beef cube, stir until fully dissolved.

Add onions, garlic, soy sauce, Worcestershire sauce, brown sugar, salt, ground black pepper and simmer for 10 minutes. Make sure to trap the steam by covering the saucepan. Add extra water if needed.

Add the constarch mixture, cook and stir until sauce becomes thick. Strain the liquid to get rid of the onion and other bits.

Transfer your sauce to a serving container.

Assemble and cook your Siopao:
Flatten the dough until a round shape is formed, first with your hand, then with a rolling pin.

Put the asado filling in the middle of the dough and wrap by pulling and crimping the sides together. Gather on top and twist it around.

Place the siopao on individually cut wax paper and cook them in a steamer for 15 minutes.

Serve hot with your home made sauce and enjoy!
0 Comments

    Fave Recipes

    I'm No Chef but I love food like it's no one's business.

    I didn't know anything about cooking... frying an egg used to be a nightmare.. until I was forced to learn more... I had my first born... that's when my gastronomic journey started...

    Join me in my food quest.
    Laugh at my embarrassing moments.
    Share my triumphs.

    And if you're brave enough ... cook with me (ooooh scary!), virtually that is, and have the most enjoyable time!

    Welcome aboard
    fellow foodies!

    Print Friendly and PDF

    Categories

    All
    Ac Spin
    Appetizer
    Baking
    Bbq
    Beef
    Bread
    Breakfast
    Butter
    Chicken
    Dairy
    Dessert
    Drink
    Entree
    Fave
    Fondant
    Gobbledtooquicklyphotosnexttime
    Halloween
    Icing And Frosting
    Lamb
    Main Course
    Marinade
    Nibbles
    Occasions
    Pasta
    Pastry
    Pork
    Poultry
    Rice
    Salad
    Sandwich
    Sauce
    Seafood
    Side Dish
    Slow Cooker
    Smoothie
    Snacks
    Soup
    Spaghetti Challenge
    Stew
    Stock
    Tapas
    Vegetables
    Workinprogress
    Zespiri Kiwifruit

    Archives

    February 2016
    January 2016
    January 2013
    November 2012
    October 2012
    September 2012
    August 2012
    July 2012
    June 2012
    May 2012
    April 2012
    March 2012
    February 2012
    September 2011
    August 2011
    July 2011
    June 2011
    May 2011
    April 2011
    February 2011
    January 2011
    December 2010
    November 2010
    October 2010
    September 2010
    August 2010

    RSS Feed

Powered by Create your own unique website with customizable templates.