Credits: Thanks Ate Mi for sharing this amazing recipe...
Pan de Sal is like dinner rolls but I'm biased so I'd say it's fluffier and tastier than your usual dinner rolls.
I grew up with Pan de Sal. I ate it almost every single time, definitely not as dinner rolls, mostly, at breakfast, afternoon snack, or just when I'm bored and wants to have a nibble.
We eat it different ways. Plain, with jams, with savoury stuffing in it, as an accompaniment to stir fry noodles, with bacon, egg or hotdogs, to eat left over food that has sauce to soak the bread with ... this bread is sooo versatile that the next time I make one, I'm literally going to stuff it.
Traditionally, it's baked in a stone oven... the proper horno. Pan de Sal baked from conventional oven tastes great but traditional oven is pleasantly unique. But, for the time being, my humble oven will do... hope it won't complain of over fatigue. Seems like this is going to be a family favourite... my youngest is already hooked on it.
It took me at least a year to muster the courage to bake pan de sal... no regrets... just happy I didn't jump the gun with some lame recipe... this one really works!
Tip 1: Be patient, your dough will come together
Tip 2: Make sure your yeast gets properly proofed. Your milk should not be too hot nor too cold. If you can't stick your finger in it, it means it's too hot. It should be blood temperature.
Tip 3: Add a cup or more flour to help form the dough. You want your dough pliable... but not wet. You're going to go by touch, it can't be dry too.
Tip 4: Your pan de sal doesn't have to be all uniform.... it's home made! you want it to be as rustic as a home-made should look like... if you want it uniform... might as well buy it from the bakeshops.
Ingredients:
yeast mixture
1 cup lukewarm milk
1 tbsp sugar
1 tbsp active dry yeast
dry ingredients
5 cups bread flour
1 1/2 tsp salt
1 cup sugar
milk mixture
1 cup milk
1/2 stick butter or 60 grams, cut into small pieces
extra 1/2 cup milk
1 egg
extra 1 - 1 1/2 cup bread flour
bread crumbs
Makes 20 pan de sals
Procedures:
Add 1 tbsp yeast and 1 tbsp sugar to the lukewarm milk. Stir and let it sit for 15 minutes. It should have a beer-foam appearance on top after the wait, if it doesn't then the yeast did not activate and you must re-do the mixture.
In a microwavable bowl, combine milk and butter pieces together. Heat for 1 1/2 minutes. Mix and make sure all the butter is melted. Add the remaining half cup milk and 1 egg, then beat a little.
Add your yeast mixture to the milk mixture, stir a little until just combined.
Add the liquid mixture to the dry ingredients.
Using a wooden spatula, start folding until dough starts to form. At some point, you'll be ditching the spatula and will start mixing with your hand for about 8 minutes or at least until the dough starts clearing the sides of your bowl by gradually adding additional 1 cup to 1 1/2 cup extra bread flour.
Transfer your dough to a lightly floured surface and knead the dough further. When it no longer clings to your fingers and becomes elastic, form a clean ball and return to your bowl. Cover with damp cheesecloth or towel and rest for one hour.
Transfer the dough again to a lightly floured surface and knead a little more to knock out the air. Rest for another 30 minutes (you can skip this middle resting if you want). Divide into 3 portions.
Work on each portion by flattening it to 1/2 inch thick and 11 inches wide rectangle.
Roll the wide side towards you, tucking the seams with your palms until you have a semi log.
Cut to 1 inch to 1 1/2 inches portion, making 6-7 individual rolls per big portion.
Roll your individual portions onto bread crumbs and place on your baking sheet with the cut sides on top and bottom.
Place them half inch apart so when it bakes, it will rise high enough and will be fluffier than if it's too far apart. Rest for another 1 hour to let the dough expand a little bit more.
Bake in a pre-heated oven on 350 degrees for 15 minutes or until your preferred colour, pale, golden brown, brown.
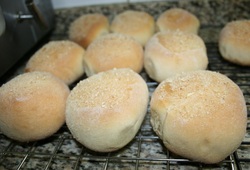
Fresh from the oven, open one and see how soft and fluffy your creation is! Enjoy your home made pan de sal that will beat any commercially made ones...!
Happy eating!
Pan de Sal is like dinner rolls but I'm biased so I'd say it's fluffier and tastier than your usual dinner rolls.
I grew up with Pan de Sal. I ate it almost every single time, definitely not as dinner rolls, mostly, at breakfast, afternoon snack, or just when I'm bored and wants to have a nibble.
We eat it different ways. Plain, with jams, with savoury stuffing in it, as an accompaniment to stir fry noodles, with bacon, egg or hotdogs, to eat left over food that has sauce to soak the bread with ... this bread is sooo versatile that the next time I make one, I'm literally going to stuff it.
Traditionally, it's baked in a stone oven... the proper horno. Pan de Sal baked from conventional oven tastes great but traditional oven is pleasantly unique. But, for the time being, my humble oven will do... hope it won't complain of over fatigue. Seems like this is going to be a family favourite... my youngest is already hooked on it.
It took me at least a year to muster the courage to bake pan de sal... no regrets... just happy I didn't jump the gun with some lame recipe... this one really works!
Tip 1: Be patient, your dough will come together
Tip 2: Make sure your yeast gets properly proofed. Your milk should not be too hot nor too cold. If you can't stick your finger in it, it means it's too hot. It should be blood temperature.
Tip 3: Add a cup or more flour to help form the dough. You want your dough pliable... but not wet. You're going to go by touch, it can't be dry too.
Tip 4: Your pan de sal doesn't have to be all uniform.... it's home made! you want it to be as rustic as a home-made should look like... if you want it uniform... might as well buy it from the bakeshops.
Ingredients:
yeast mixture
1 cup lukewarm milk
1 tbsp sugar
1 tbsp active dry yeast
dry ingredients
5 cups bread flour
1 1/2 tsp salt
1 cup sugar
milk mixture
1 cup milk
1/2 stick butter or 60 grams, cut into small pieces
extra 1/2 cup milk
1 egg
extra 1 - 1 1/2 cup bread flour
bread crumbs
Makes 20 pan de sals
Procedures:
Add 1 tbsp yeast and 1 tbsp sugar to the lukewarm milk. Stir and let it sit for 15 minutes. It should have a beer-foam appearance on top after the wait, if it doesn't then the yeast did not activate and you must re-do the mixture.
In a microwavable bowl, combine milk and butter pieces together. Heat for 1 1/2 minutes. Mix and make sure all the butter is melted. Add the remaining half cup milk and 1 egg, then beat a little.
Add your yeast mixture to the milk mixture, stir a little until just combined.
Add the liquid mixture to the dry ingredients.
Using a wooden spatula, start folding until dough starts to form. At some point, you'll be ditching the spatula and will start mixing with your hand for about 8 minutes or at least until the dough starts clearing the sides of your bowl by gradually adding additional 1 cup to 1 1/2 cup extra bread flour.
Transfer your dough to a lightly floured surface and knead the dough further. When it no longer clings to your fingers and becomes elastic, form a clean ball and return to your bowl. Cover with damp cheesecloth or towel and rest for one hour.
Transfer the dough again to a lightly floured surface and knead a little more to knock out the air. Rest for another 30 minutes (you can skip this middle resting if you want). Divide into 3 portions.
Work on each portion by flattening it to 1/2 inch thick and 11 inches wide rectangle.
Roll the wide side towards you, tucking the seams with your palms until you have a semi log.
Cut to 1 inch to 1 1/2 inches portion, making 6-7 individual rolls per big portion.
Roll your individual portions onto bread crumbs and place on your baking sheet with the cut sides on top and bottom.
Place them half inch apart so when it bakes, it will rise high enough and will be fluffier than if it's too far apart. Rest for another 1 hour to let the dough expand a little bit more.
Bake in a pre-heated oven on 350 degrees for 15 minutes or until your preferred colour, pale, golden brown, brown.
Fresh from the oven, open one and see how soft and fluffy your creation is! Enjoy your home made pan de sal that will beat any commercially made ones...!
Happy eating!
My first attempt on my beloved pan de sal... pretty much a disaster... as they say, practice makes perfect, so I'm practicing!
My second attempt, soooo much better... yipee!

 RSS Feed
