FV37-01-1210
This is obviously a recipe I just tried, amended only to Mocha Buttercream Icing from Chocolate Buttercream Icing. Thanks to Wilton for the recipe.
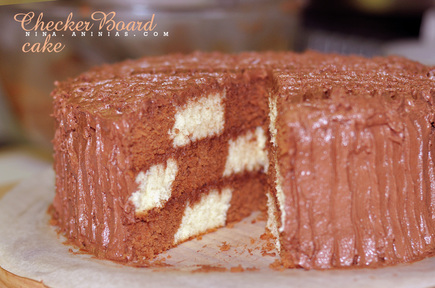
It's sooo nice to see the checkered design and realised you actually made it.
Tip 1: If you find the icing too sweet, don't spread it all over (like what I did), make a stripes or blob stars as design.
Tip 2: Buy yourself a checkerboard pan. It's a Wilton brand
Tip 3: Use a pouring jug or piping bag to handle filling easier
Tip 4: You need someone to help you ensure the divider is not moving and the gap underneath is closed off. For a Wilton, this product is not up to par, to be honest.
Ingredients:
2 sticks of butter (1 cup), softened
2 2/3 cups granulated sugar
3 eggs
2 teaspoons vanilla extract (which is not available here since it has alcohol so I use the original vanilla pods and scrape enough for the recipe.
4 cups all-purpose flour
1 tablespoon baking powder
1 teaspoon salt
2 cups milk
4 ounces of semi-sweet chocolate, melted. I used Lindt Madagascar choc which is 65% cocoa
Mocha Buttercream Icing (Recipe on site)
Serves 20 slices
Preheat oven to 350°F. Spray pans with vegetable spray to ensure your cake will be released easily and you'll have less crumbs.
Cream butter and sugar with electric mixer until light and fluffy. Add eggs one at a time. Add vanilla and mix well.
In another bowl, combine flour, baking powder and salt.
Alternately, add milk and flour mixture to the butter, mix well after each addition.
Continue beating 1 minute. Divide batter in half. Stir melted chocolate into half the batter, mix well.
Place Batter Dividing Ring into one prepared pan. Follow instructions in pan set for filling. Remove ring, wash and dry before using to the 2nd and 3rd pan.
Bake 30-35 minutes or until toothpick inserted in center comes out clean.
Cool in pan 10 minutes. Remove from pan and cool completely.
Assemble cake. Position layer with the cake that has chocolate on the outside. Spread top with mocha buttercream icing. Next layer with the cake with the yellow cake on outside. Spread with icing. Place final layer with bottom facing up to give you smoother side and will give you less crumbs. Ice all over or start designing.
You can use colored batters to replace vanilla and chocolate.
Note: Do not use plastic ring in the oven!
*I made my own checker board cake without Wilton's gadget and turned out just as pretty. The good thing about that version is you have limitless option on which type of cake you want to bake. I find Wilton's recipe tad too sweet. If you want to use your own recipe, you have to use a thick batter as syrupy one will not work, it will become a marble cake, I think. It will seep into the other side and it'll fail to come up with proper checkered effect.
I will post a how to hopefully soon. :)
This is obviously a recipe I just tried, amended only to Mocha Buttercream Icing from Chocolate Buttercream Icing. Thanks to Wilton for the recipe.
It's sooo nice to see the checkered design and realised you actually made it.
Tip 1: If you find the icing too sweet, don't spread it all over (like what I did), make a stripes or blob stars as design.
Tip 2: Buy yourself a checkerboard pan. It's a Wilton brand
Tip 3: Use a pouring jug or piping bag to handle filling easier
Tip 4: You need someone to help you ensure the divider is not moving and the gap underneath is closed off. For a Wilton, this product is not up to par, to be honest.
Ingredients:
2 sticks of butter (1 cup), softened
2 2/3 cups granulated sugar
3 eggs
2 teaspoons vanilla extract (which is not available here since it has alcohol so I use the original vanilla pods and scrape enough for the recipe.
4 cups all-purpose flour
1 tablespoon baking powder
1 teaspoon salt
2 cups milk
4 ounces of semi-sweet chocolate, melted. I used Lindt Madagascar choc which is 65% cocoa
Mocha Buttercream Icing (Recipe on site)
Serves 20 slices
Preheat oven to 350°F. Spray pans with vegetable spray to ensure your cake will be released easily and you'll have less crumbs.
Cream butter and sugar with electric mixer until light and fluffy. Add eggs one at a time. Add vanilla and mix well.
In another bowl, combine flour, baking powder and salt.
Alternately, add milk and flour mixture to the butter, mix well after each addition.
Continue beating 1 minute. Divide batter in half. Stir melted chocolate into half the batter, mix well.
Place Batter Dividing Ring into one prepared pan. Follow instructions in pan set for filling. Remove ring, wash and dry before using to the 2nd and 3rd pan.
Bake 30-35 minutes or until toothpick inserted in center comes out clean.
Cool in pan 10 minutes. Remove from pan and cool completely.
Assemble cake. Position layer with the cake that has chocolate on the outside. Spread top with mocha buttercream icing. Next layer with the cake with the yellow cake on outside. Spread with icing. Place final layer with bottom facing up to give you smoother side and will give you less crumbs. Ice all over or start designing.
You can use colored batters to replace vanilla and chocolate.
Note: Do not use plastic ring in the oven!
*I made my own checker board cake without Wilton's gadget and turned out just as pretty. The good thing about that version is you have limitless option on which type of cake you want to bake. I find Wilton's recipe tad too sweet. If you want to use your own recipe, you have to use a thick batter as syrupy one will not work, it will become a marble cake, I think. It will seep into the other side and it'll fail to come up with proper checkered effect.
I will post a how to hopefully soon. :)
Enjoyed this recipe? Subscribe to Fave Recipes for updates!

 RSS Feed
