I made my first Hot Bun half a year ago and though I was proud of the recipe I discovered, I'm still on the lookout for a recipe that will make my face smile with just pure glee. I did, with this second version.
The first version was good, the flavour is reminscent of the hot buns I grew up with. However, this new one that I ventured into incorporated the old flavour while including other flavours that takes hot buns onto a different level. There is a depth of flavour that is more of a grown up version of the ones I used to enjoy.
I think the most important reason why I enjoyed making this second version more than the previous one is because I matured as a baker. Also, this recipe broke the complication down to simple and almost to point of being commonsensical. Those light bulb moments when you're doing something and your finally understood the reason behind why you're doing certain things in a particular way and realized that recipes are basic guidelines, you really don't have to follow it to the tee.
I'd like to think that this recipe is my coming-of-age recipe, because the following recipes I've taken on after this one, have somehow got deconstructed in my head. A method in reality that takes a lot of deep understanding of how the flavours should play about and complement each other even if the ingredients were prepared differently. I know I sounded uber geeky but it is what it is.
It will be an understatement to say that this recipe belongs to my fave list.
Tip 1: Don't be scared by the process... it's surprisingly easy! Start with the dough coz you actually leave it alone for 4 hours! While the dough is puffing up, you can easily do your sauce and filling with no pressure. You can actually make the filling and sauce the day before and keep it in the fridge! How convenient is that?
Tip 2: You can knead your dough with gloves... but where's the fun in it? I kneaded it with bare hands, of course I washed my hands really well first... then I slathered them with Crisco... yes, Minny Jackson's fave Crisco... fun!
Tip 3: To help your dough in its rising stage, keep the dough in your oven (switched off!) with a bowl of hot water next to it. You'd be surprise how the bugger loves it.
Tip 4: If you don't have a lard, any oil will do.
Tip 5: Play around with the filling. It can be vegetarian, it can be chicken, beef, whatever you want it to be. The secret is the filling's seasoning, sauce and dough.
To Make the Filling
Ingredients:
3 tblspoons lard or oil
2 tblspoons garlic, minced
1 medium size onion, minced
2 tblspoons dark soy sauce
2 tblspoons light soy sauce
4 tblspoons hoisin sauce
2 tblspoons honey
2 tblspoons dry sherry or xiao hsing wine
1 tspoon sesame oil
1/2 tspoon Chinese five spice (optional)
1 tspoon grated ginger
500 grams pork loin, cut into strips, about 1/2 inch wide by 1 1/2 inch long.
1 tblspoon cornstarch, diluted with 2 tblspoons COLD water
Directions:
Combine soy sauces, hoisin sauce, honey, wine, sesame oil, five spice, ginger, garlic in a small bowl. Set aside.
Heat the oil in a pan. Sautee galic and onion. Add pork bits, soy sauce mixture and simmer for 15-20 minutes.
Add the constarch mixture, cook and stir until sauce becomes the thick consistency you prefer.
To Make the Dough
Ingredients:
1/3 cup lukewarm water
1/3 cup flour
2 1/4 tspoons active dry yeast or 1 packet
2 tspoons sugar
1 cup flour
3/4 cup cake flour
1 tspoon baking powder
1/2 tspoon salt
2 tblspoons sugar
1 tblspoon oil
1/2 cup lukewarm water
1 tspoon baking powder
Directions:
Proof the yeast by combining water, flour, yeast and sugar (first 4 ingredients) in a large bowl and set aside for half an hour.
Mix in flours, baking powder, salt, sugar and oil. Continue mixing while slowly pouring water until it just forms a dough.
Knead the dough on a board until smooth, about 5 minutes.
Place the dough back into the bowl. Cover with plastic wrap and set aside for 4 hours.
Sprinkle the remaining baking powder on top and knead again.
Roll a log and divide into approximately 12 chunks or 50-60 grams each piece to be exact.
To Make the Sauce
1 beef broth cube
2 cups water
2 tbsp corn starch diluted in a 4 tblsps of cold water
1/4 cup diced onions
2 cloves diced garlic
Fresh ground black pepper
4 tbsps brown sugar
2 tbsps soy sauce
1 tbsp Worcestershire sauce
1 teaspoon salt
Directions:
Place 2 cups of water in a saucepan. Boil and add the beef cube, stir until fully dissolved.
Add onions, garlic, soy sauce, Worcestershire sauce, brown sugar, salt, ground black pepper and simmer for 10 minutes. Make sure to trap the steam by covering the saucepan. Add extra water if needed.
Add the constarch mixture, cook and stir until sauce becomes thick. Strain the liquid to get rid of the onion and other bits.
Transfer your sauce to a serving container or better yet a squishy bottle.
Assembling and Steaming Your Siu Bao:
Flatten the dough until a round shape is formed, first with your hand, then with a rolling pin.
Place 2 tbspoons filling in the middle of the dough and wrap by pulling and crimping the sides together. Gather on top and twist it around.
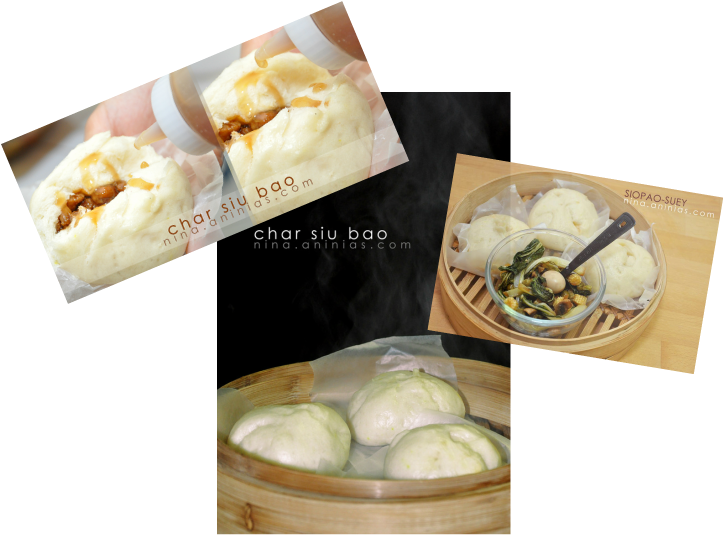
Place the siopao on individually cut wax paper and cook them in a steamer for 15 minutes.
You can make 12 hot buns with these recipe, prolly some left over filling and a bottle of sauce. Serve your Siu Bao hot with your home made sauce and enjoy!
-AcousticChef, cookin' one tune at a time!
The first version was good, the flavour is reminscent of the hot buns I grew up with. However, this new one that I ventured into incorporated the old flavour while including other flavours that takes hot buns onto a different level. There is a depth of flavour that is more of a grown up version of the ones I used to enjoy.
I think the most important reason why I enjoyed making this second version more than the previous one is because I matured as a baker. Also, this recipe broke the complication down to simple and almost to point of being commonsensical. Those light bulb moments when you're doing something and your finally understood the reason behind why you're doing certain things in a particular way and realized that recipes are basic guidelines, you really don't have to follow it to the tee.
I'd like to think that this recipe is my coming-of-age recipe, because the following recipes I've taken on after this one, have somehow got deconstructed in my head. A method in reality that takes a lot of deep understanding of how the flavours should play about and complement each other even if the ingredients were prepared differently. I know I sounded uber geeky but it is what it is.
It will be an understatement to say that this recipe belongs to my fave list.
Tip 1: Don't be scared by the process... it's surprisingly easy! Start with the dough coz you actually leave it alone for 4 hours! While the dough is puffing up, you can easily do your sauce and filling with no pressure. You can actually make the filling and sauce the day before and keep it in the fridge! How convenient is that?
Tip 2: You can knead your dough with gloves... but where's the fun in it? I kneaded it with bare hands, of course I washed my hands really well first... then I slathered them with Crisco... yes, Minny Jackson's fave Crisco... fun!
Tip 3: To help your dough in its rising stage, keep the dough in your oven (switched off!) with a bowl of hot water next to it. You'd be surprise how the bugger loves it.
Tip 4: If you don't have a lard, any oil will do.
Tip 5: Play around with the filling. It can be vegetarian, it can be chicken, beef, whatever you want it to be. The secret is the filling's seasoning, sauce and dough.
To Make the Filling
Ingredients:
3 tblspoons lard or oil
2 tblspoons garlic, minced
1 medium size onion, minced
2 tblspoons dark soy sauce
2 tblspoons light soy sauce
4 tblspoons hoisin sauce
2 tblspoons honey
2 tblspoons dry sherry or xiao hsing wine
1 tspoon sesame oil
1/2 tspoon Chinese five spice (optional)
1 tspoon grated ginger
500 grams pork loin, cut into strips, about 1/2 inch wide by 1 1/2 inch long.
1 tblspoon cornstarch, diluted with 2 tblspoons COLD water
Directions:
Combine soy sauces, hoisin sauce, honey, wine, sesame oil, five spice, ginger, garlic in a small bowl. Set aside.
Heat the oil in a pan. Sautee galic and onion. Add pork bits, soy sauce mixture and simmer for 15-20 minutes.
Add the constarch mixture, cook and stir until sauce becomes the thick consistency you prefer.
To Make the Dough
Ingredients:
1/3 cup lukewarm water
1/3 cup flour
2 1/4 tspoons active dry yeast or 1 packet
2 tspoons sugar
1 cup flour
3/4 cup cake flour
1 tspoon baking powder
1/2 tspoon salt
2 tblspoons sugar
1 tblspoon oil
1/2 cup lukewarm water
1 tspoon baking powder
Directions:
Proof the yeast by combining water, flour, yeast and sugar (first 4 ingredients) in a large bowl and set aside for half an hour.
Mix in flours, baking powder, salt, sugar and oil. Continue mixing while slowly pouring water until it just forms a dough.
Knead the dough on a board until smooth, about 5 minutes.
Place the dough back into the bowl. Cover with plastic wrap and set aside for 4 hours.
Sprinkle the remaining baking powder on top and knead again.
Roll a log and divide into approximately 12 chunks or 50-60 grams each piece to be exact.
To Make the Sauce
1 beef broth cube
2 cups water
2 tbsp corn starch diluted in a 4 tblsps of cold water
1/4 cup diced onions
2 cloves diced garlic
Fresh ground black pepper
4 tbsps brown sugar
2 tbsps soy sauce
1 tbsp Worcestershire sauce
1 teaspoon salt
Directions:
Place 2 cups of water in a saucepan. Boil and add the beef cube, stir until fully dissolved.
Add onions, garlic, soy sauce, Worcestershire sauce, brown sugar, salt, ground black pepper and simmer for 10 minutes. Make sure to trap the steam by covering the saucepan. Add extra water if needed.
Add the constarch mixture, cook and stir until sauce becomes thick. Strain the liquid to get rid of the onion and other bits.
Transfer your sauce to a serving container or better yet a squishy bottle.
Assembling and Steaming Your Siu Bao:
Flatten the dough until a round shape is formed, first with your hand, then with a rolling pin.
Place 2 tbspoons filling in the middle of the dough and wrap by pulling and crimping the sides together. Gather on top and twist it around.
Place the siopao on individually cut wax paper and cook them in a steamer for 15 minutes.
You can make 12 hot buns with these recipe, prolly some left over filling and a bottle of sauce. Serve your Siu Bao hot with your home made sauce and enjoy!
-AcousticChef, cookin' one tune at a time!

 RSS Feed
